
How to Enable Custom SSL Certificate
To enable a Custom SSL Certificate, you need to follow the steps shown below. It will take about an hour to finish the whole setup.
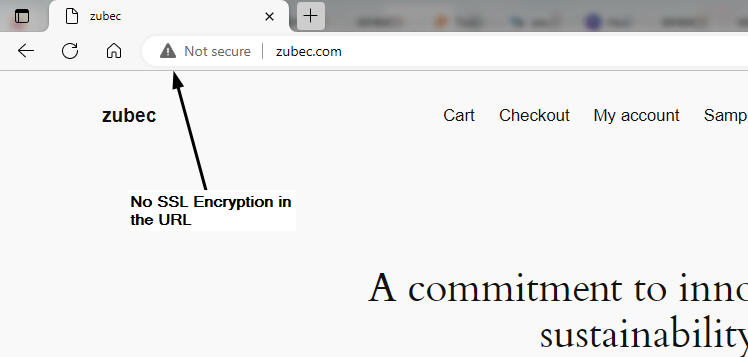
First make sure there is no SSL running on your site as shown on left image. Disable Auto SSL if you have previously activated it from your SellCloud Admin Panel.
Step One: Generate an SSL Key and CSR
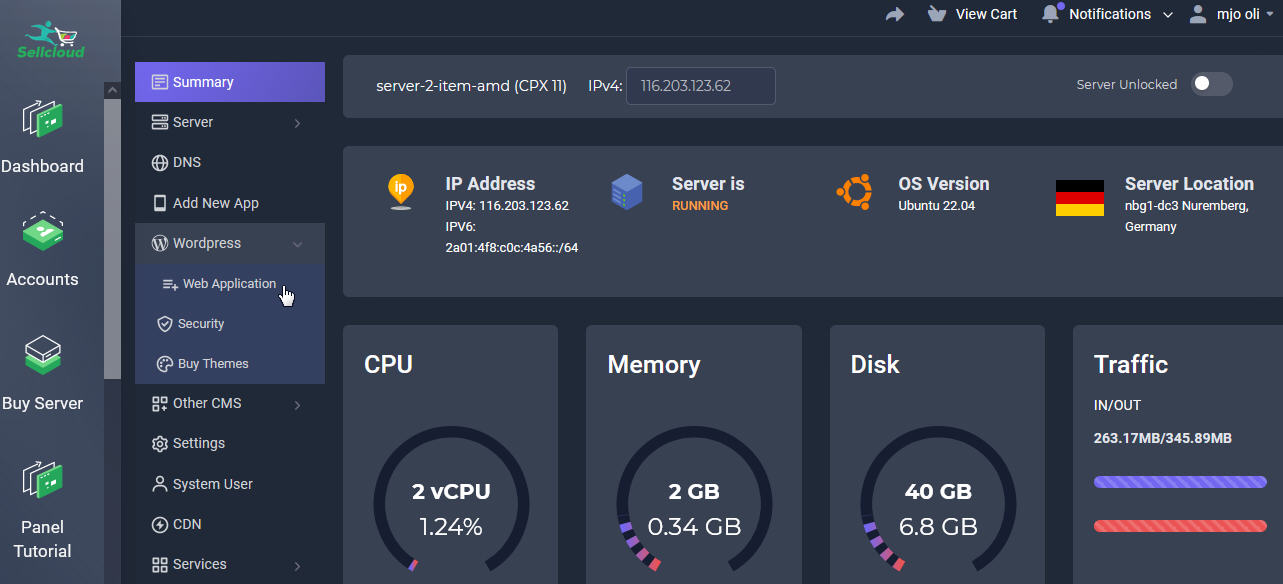
Step 1: Login to SellCloud admin panel
Generating an SSL key and certificate signing request (CSR) is the first step in making your website securely available over HTTPS.
Using SellCloud is the easiest way to create your key and CSR. Login to SellCloud admin panel. Then, go to your app's SSL tab in SellCloud Dashboard > Products/Services > Your Server > Wordpress > Web Application > Your App > SSL).
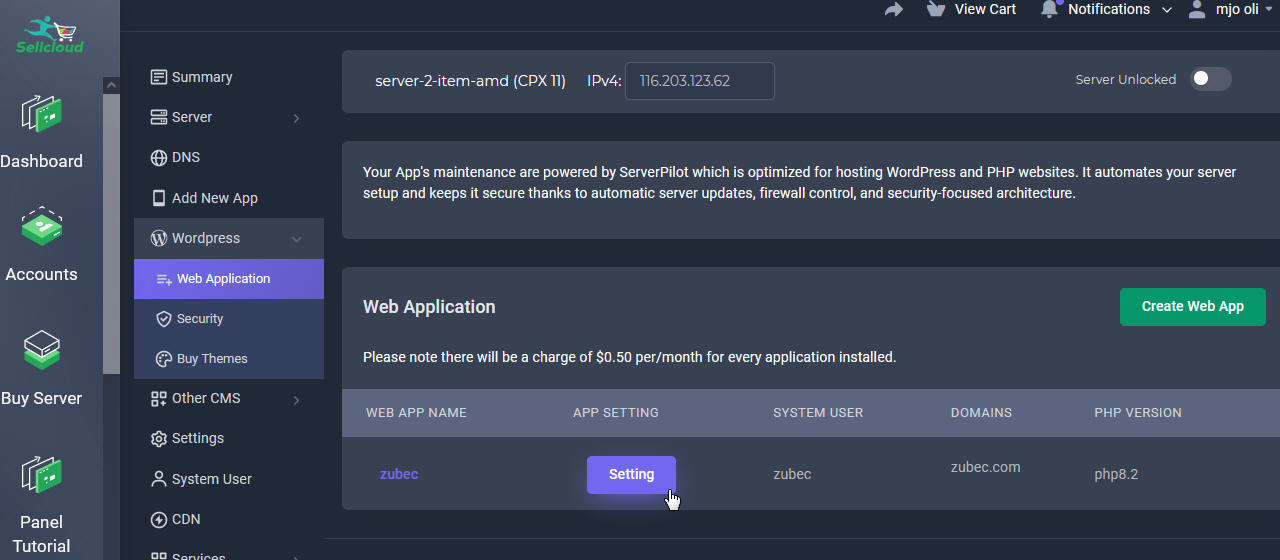
Step 2: Web Application Tab
Then, go to your app's SSL tab in SellCloud Dashboard > Products/Services > Your Server > Wordpress > Web Application > Your App > SSL).
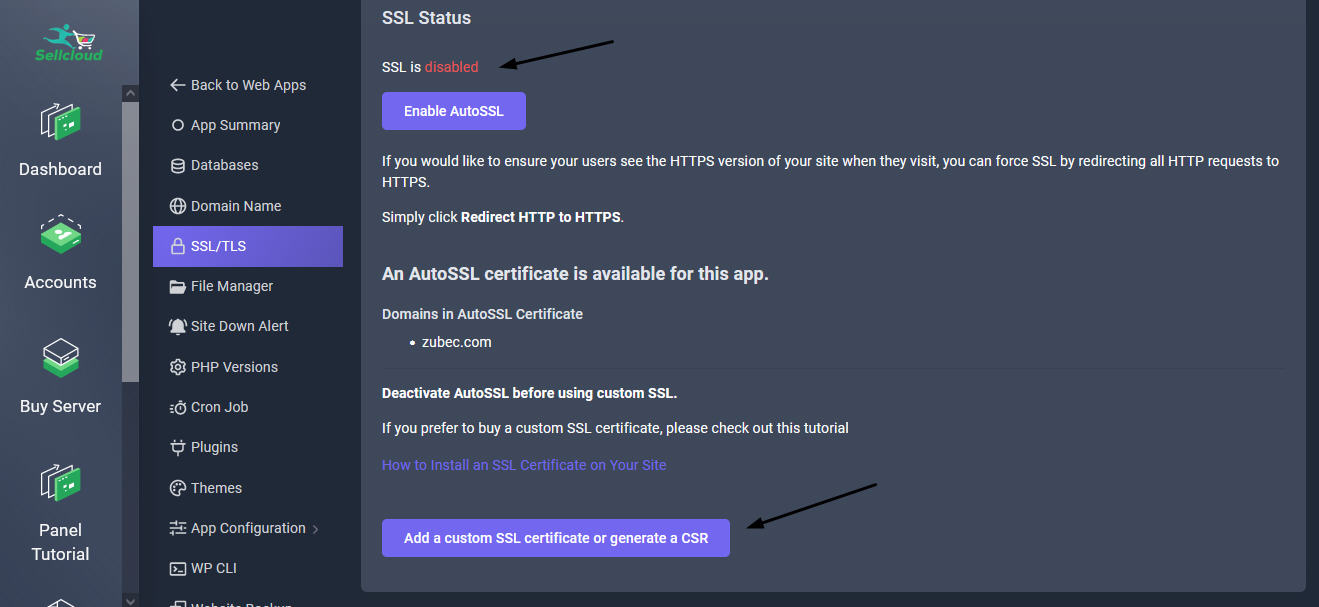
Step 3: Deactivate AutoSSL
You'll see that SSL is not enabled. Deactivate AutoSSL before using custom SSL. Then click "Add a custom certificate or generate a CSR button"
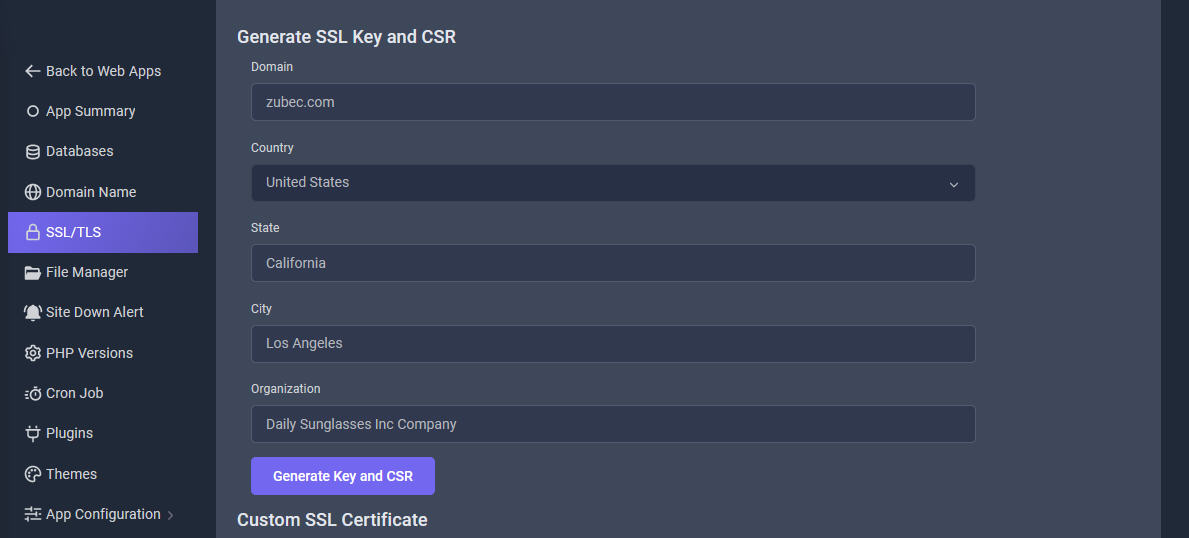
Step 4: Generate an SSL Key and CSR
Now, enter your app's domain followed by your location and organization name. Click Generate Key and CSR.
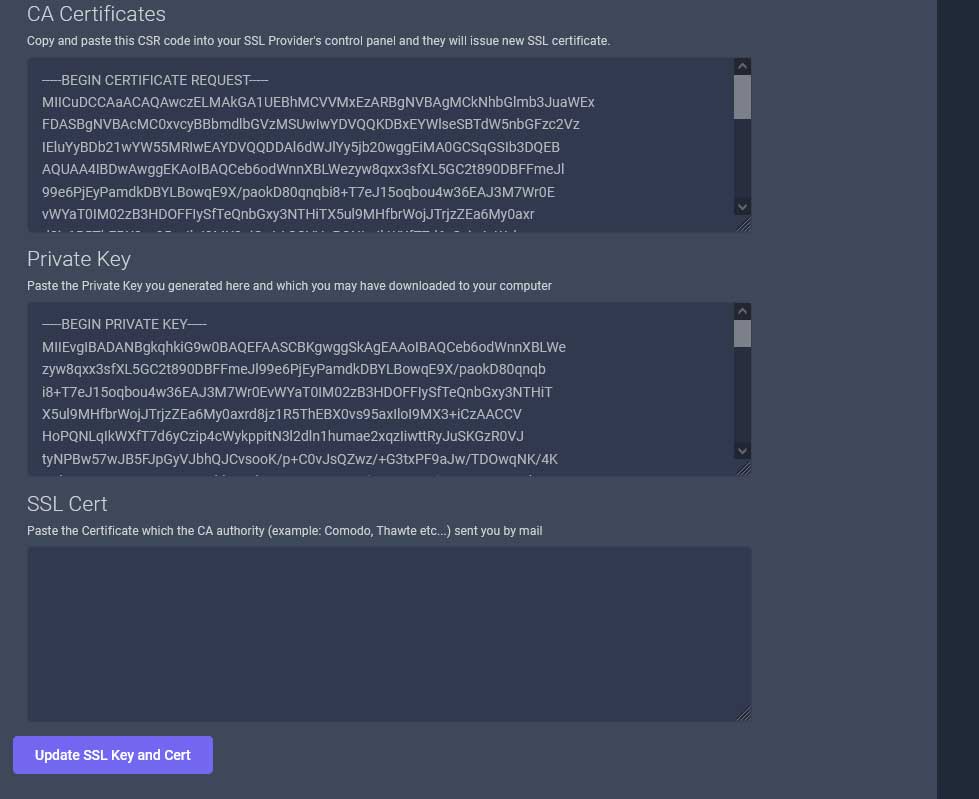
Step 5: Generate an SSL Key and CSR
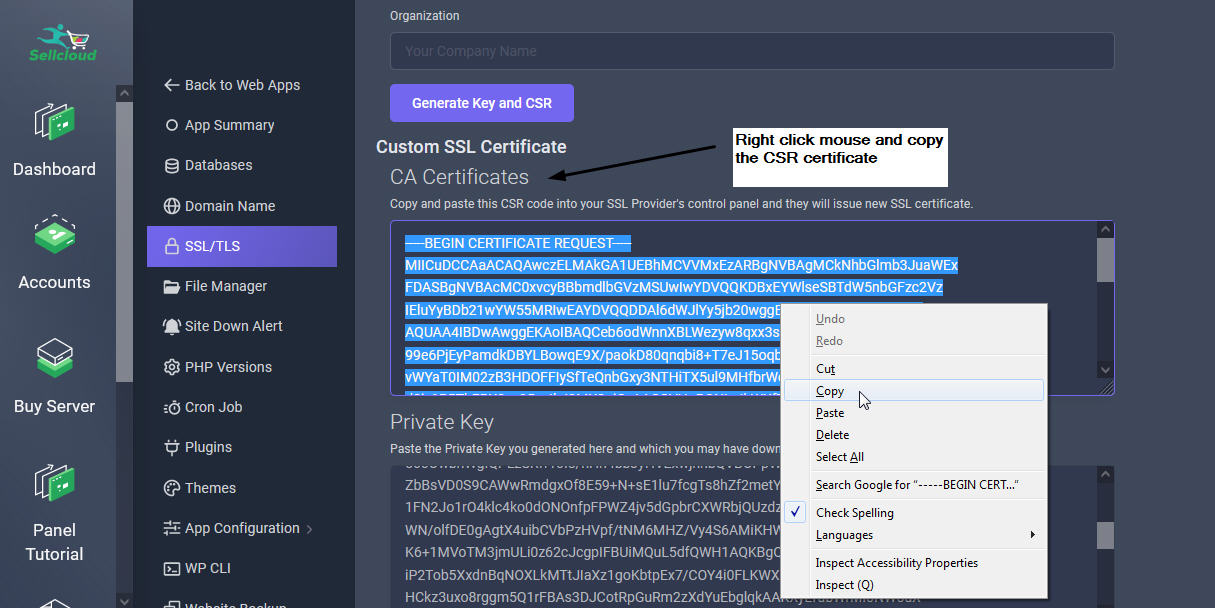
SellCloud will automatically generate a CSR and SSL key for your app from your server. You will notice there are 3 fields shown in the panel.
- First is the CSR Certificate. Copy it and paste it in a text notepad.
- Second is the Custom Key. It will be later added to your server in final process.
- Third is an empty field. Here you must paste the purchased SSL certificate from a certificate authority or certification authority (CA)
- Finally click the "Update SSL Key & Cert" button
Step Two: Purchase a Signed SSL Certificate
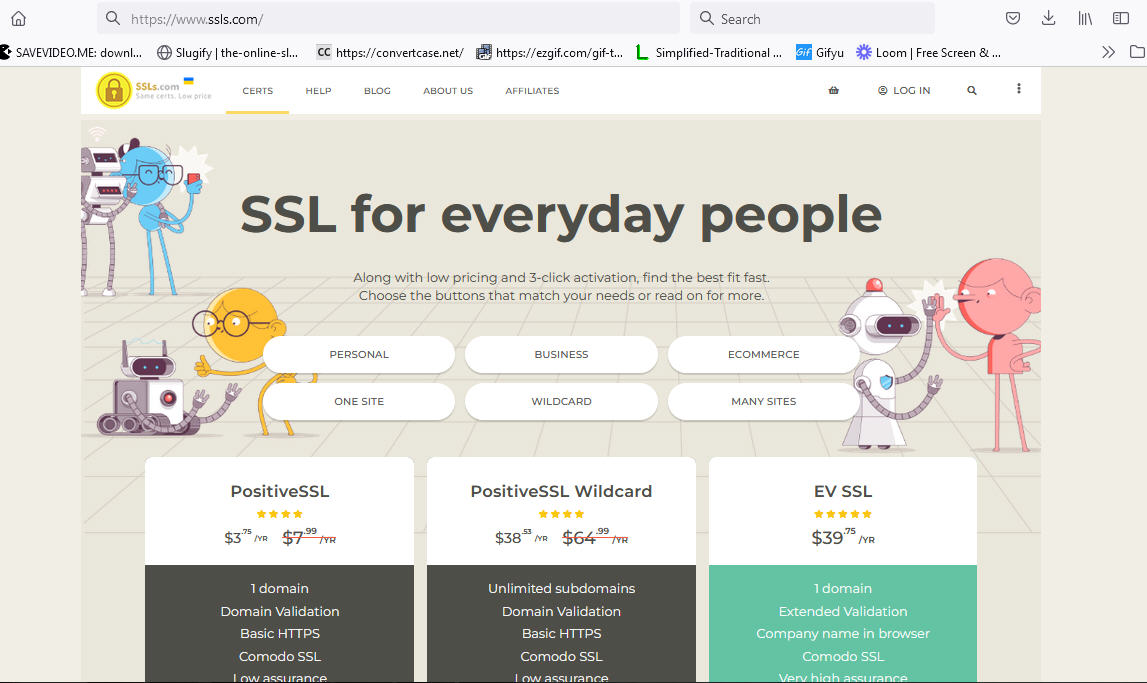
Step 7: Buy an inexpensive SSL certificate
After generating your SSL key and CSR, you will need to buy a signed SSL certificate from a CA. A CA issues the digital certificate verifying that you are the owner of your app's public key.
One option for a reasonably priced SSL certificate is the PositiveSSL from SSLS. They are a big reputable company with the cheapest pricing around.
We only mention this option because it is inexpensive, and we believe they will issue certificates that work when your domain is accessed both with and without www.
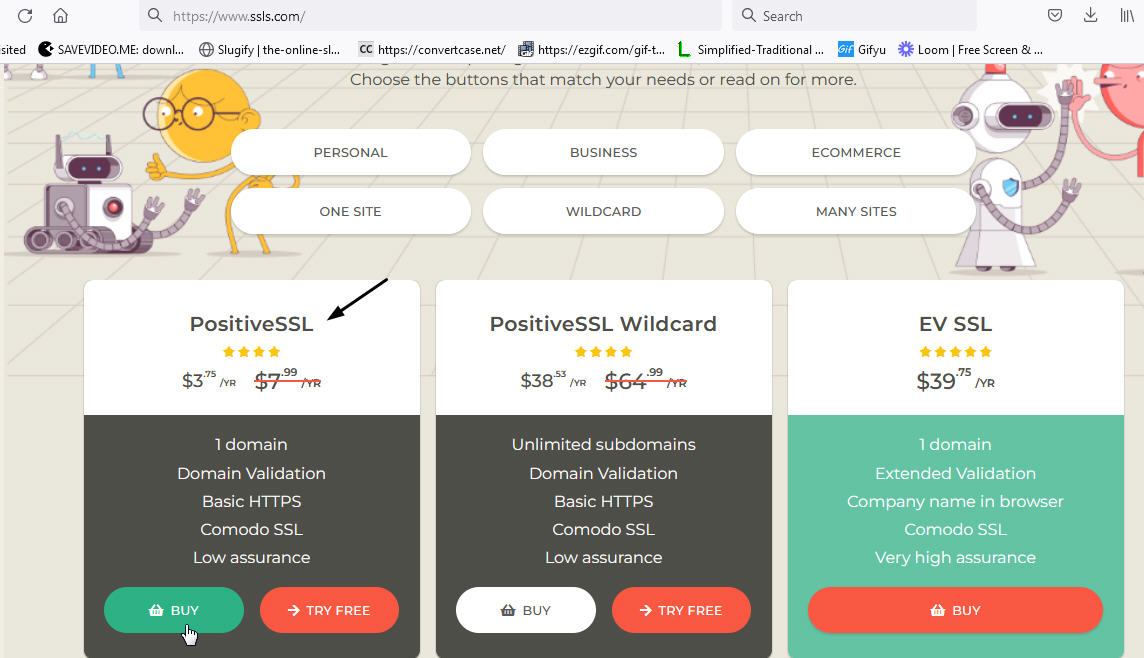
Step 8: Select & Buy Your preferred SSL Certificate
In this tutorial, we will use SSLS.com to purchase the cheapest Possitive SSL for 1 year ($9.99). If you buy for 5 years you get at a very cheap price of $3.75
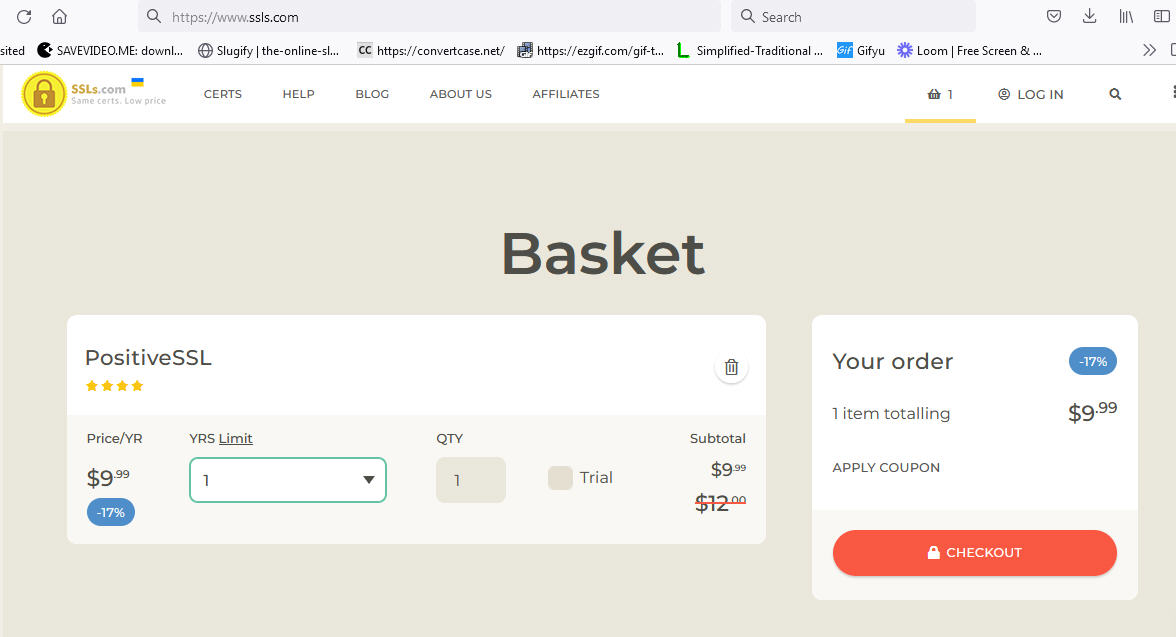
Step 9: Add to cart SSL Certificate
Click the checkout button
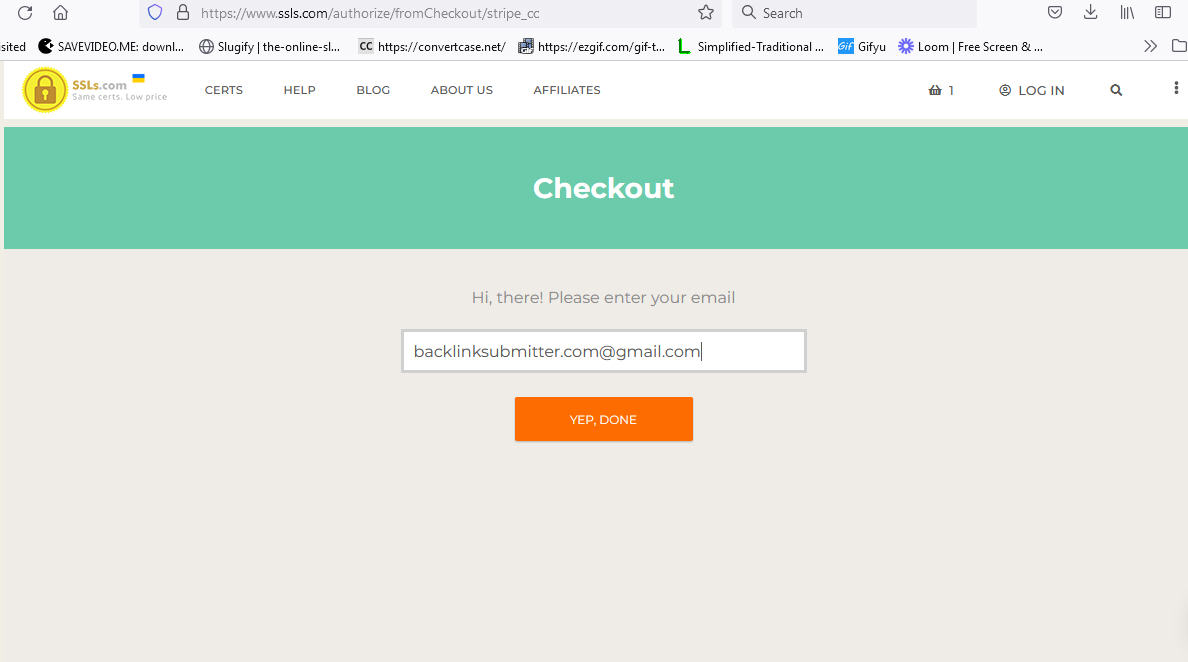
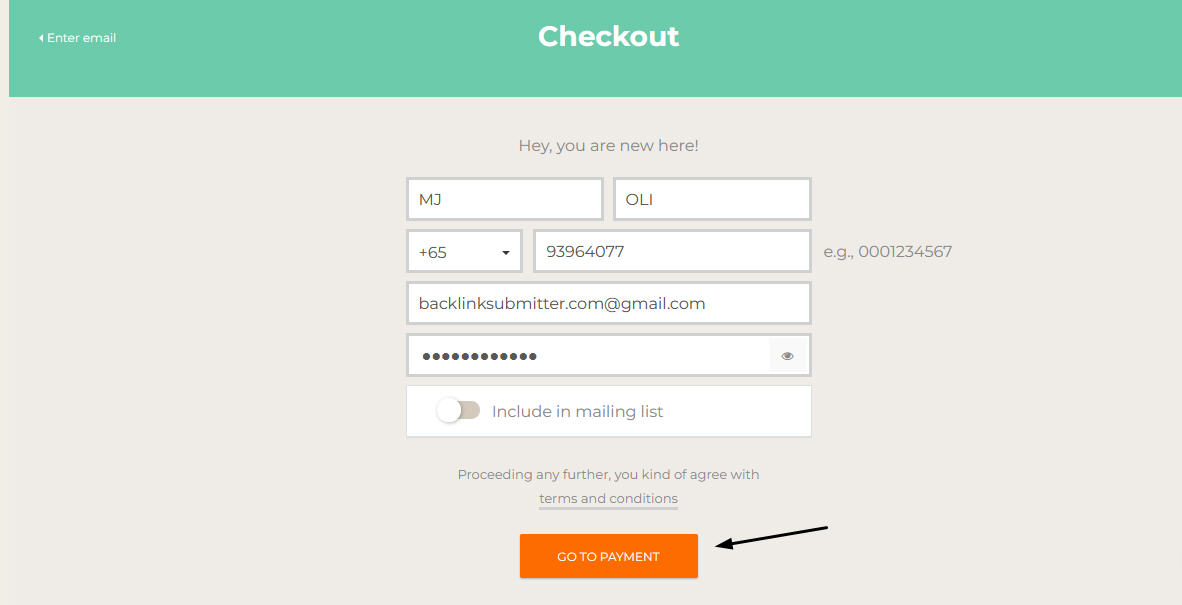
Step 11: Enter Details
In this next step enter your details and click "go to payments" button
Step 12: Generate an SSL Key and CSR
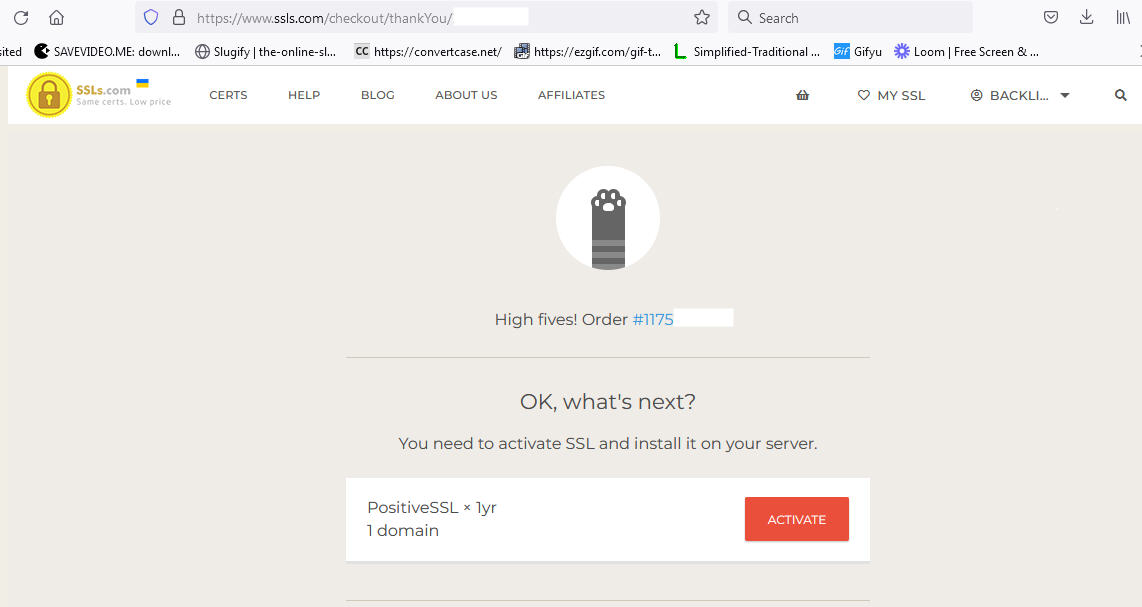
You need to activate SSL and install it on your server. Click "Activate" button
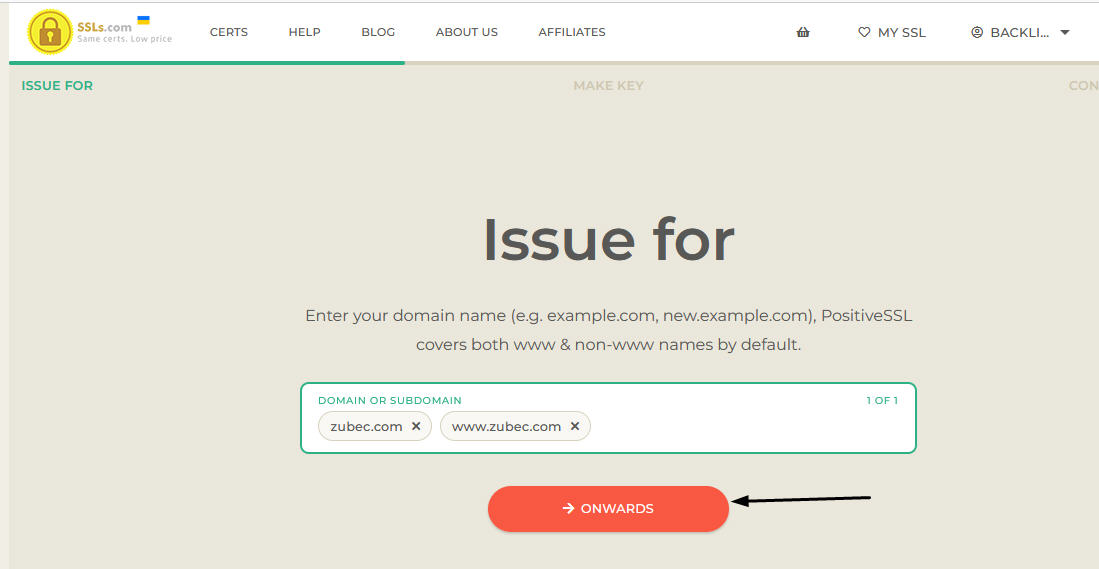
Step 13: Enter your domain name
Enter your domain name (e.g. example.com) PositiveSSL covers both www & non-www names by default. Click the "Onwards" button
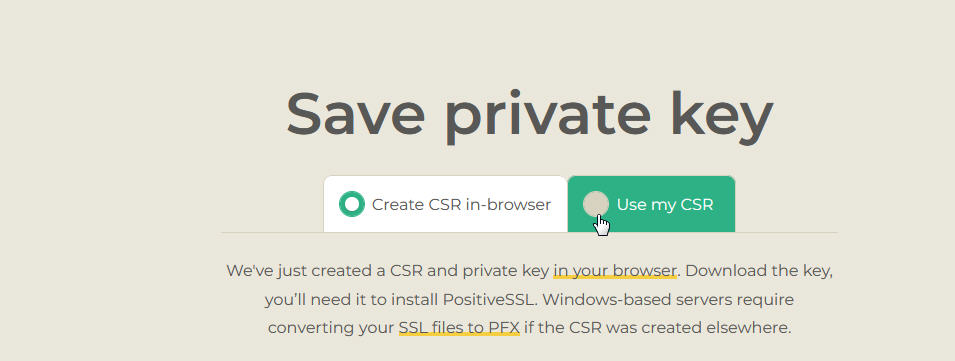
Step 14: Use my CSR
In the next step, select "Use my CSR" button
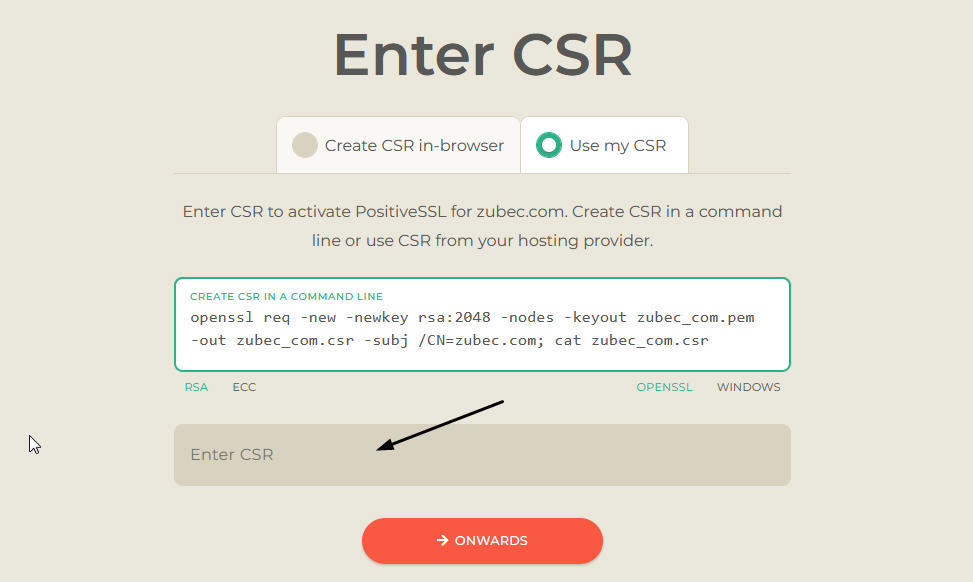
Step 15: Enter CSR
In this next step, you will notice an empty CSR Field.
Step 16: Copy CSR from SellCloud SSL Panel
In this next step, go to Sellcloud admin panel and Copy CSR from the SSL tab you generated the CSR earlier and paste it in the SSLS.com dashboard as shown in next step.
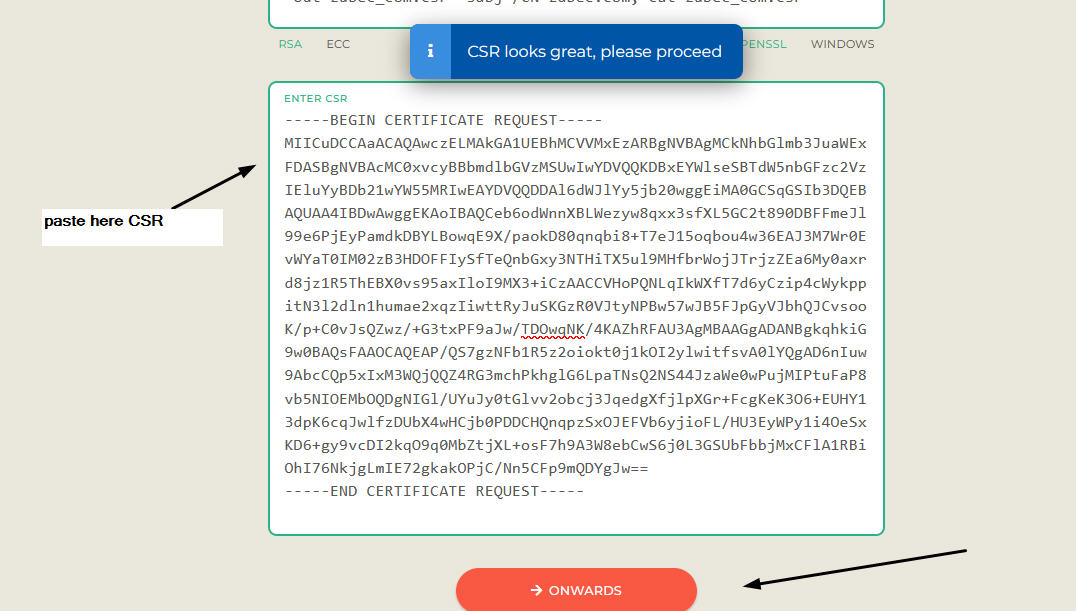
Step 17: Paste CSR code
Once you paste the copied CSR, click the "Onwards" button
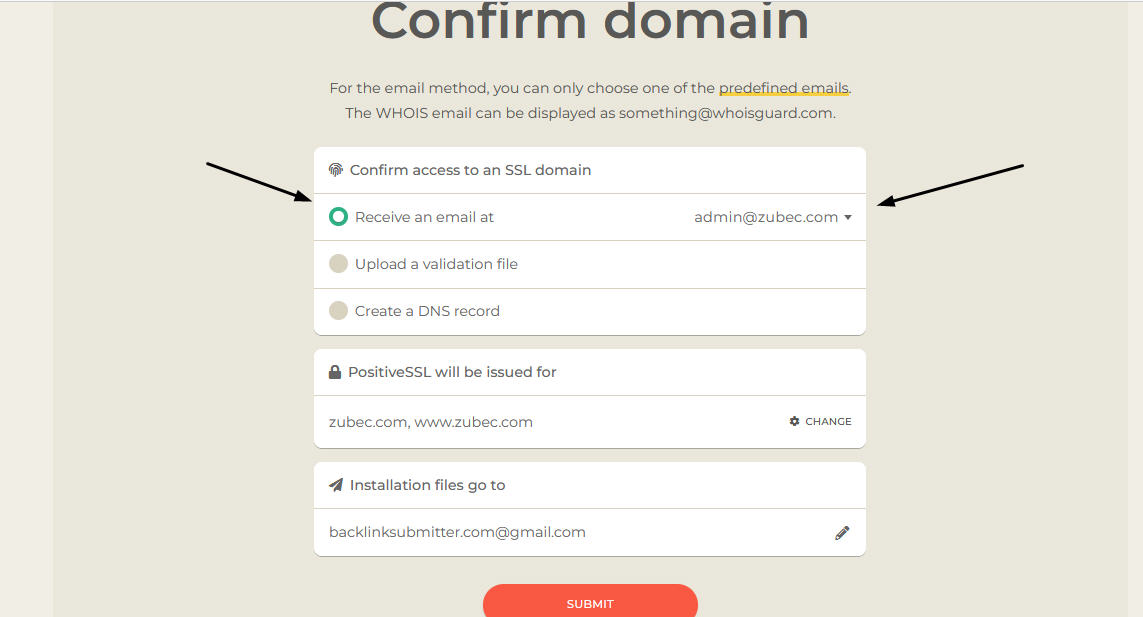
Step 18: Confirm domain
In this next step. you need to confirm the domain belongs to you. We will be using he easy method of Domain validation: Email-based. Then select "Receive an email at" with the default "admin@yourdomain.com" (example used is admin@zubec.com mailbox) and click the "Submit" button. If you don't want to use the alias for admin@ you can use webmaster@ or any other mailbox address in the pulldown)
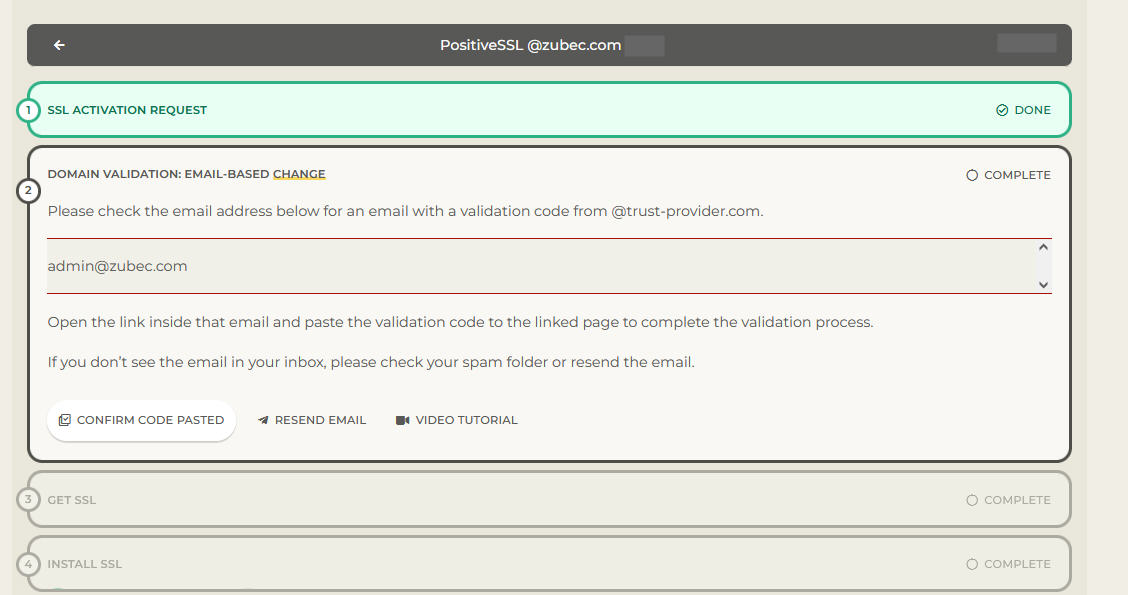
Step 19: Mail Confirmation
In the next step, it will show you a new page : "Please check the email address admin@zubec.com for an email with a validation code from @trust-provider.com".
Since we did not setup a mailbox for admin@zubec, we will now use a easy method to access the mail sent to admin@zubec by setting up an email forwarding.

Step 20: Return to SellCloud Admin Panel
To set up Mail Forwarding, retun to SellCloud Admin Panel and click the DNS Tab. From there click your Domain DNS Settings tab
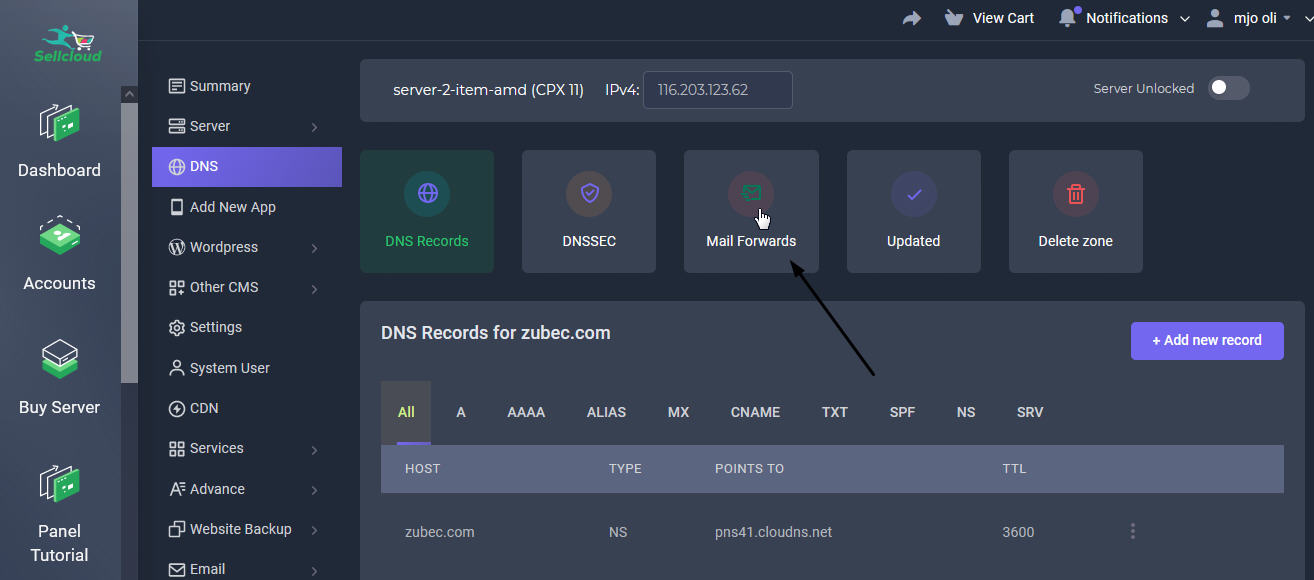
Step 21: Mail Forward Tab
Click the Mail forwards icon tab for your domain (example used: zubec.com)
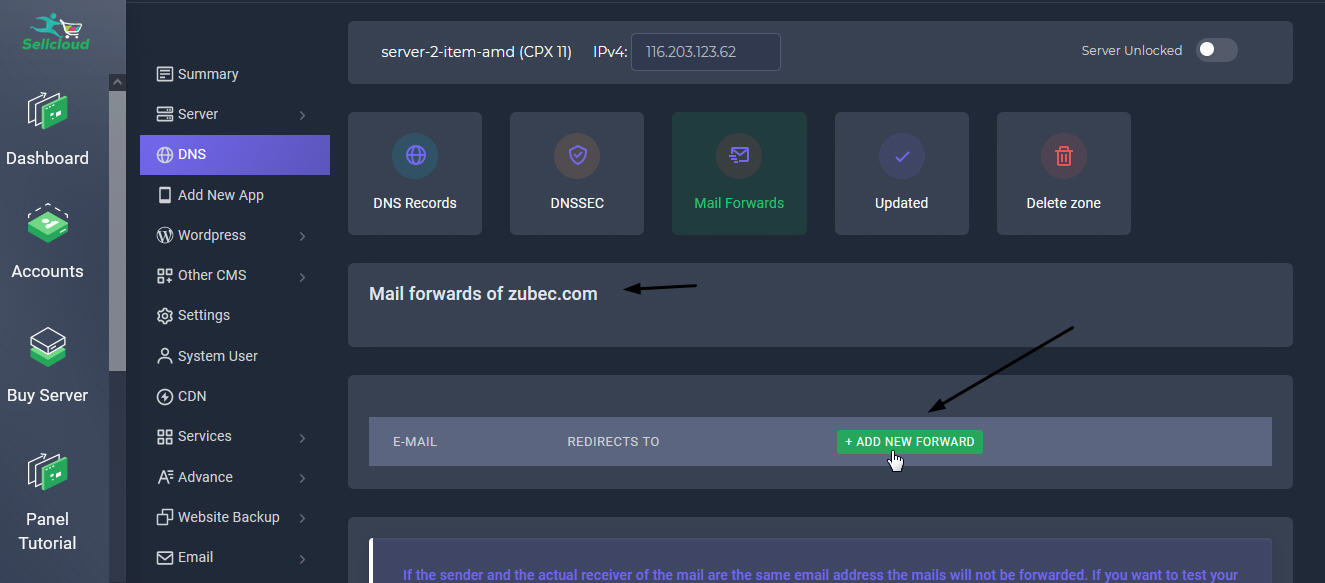
Step 22: Mail Forward Settings
Next step is to click the "Add New Forward" button
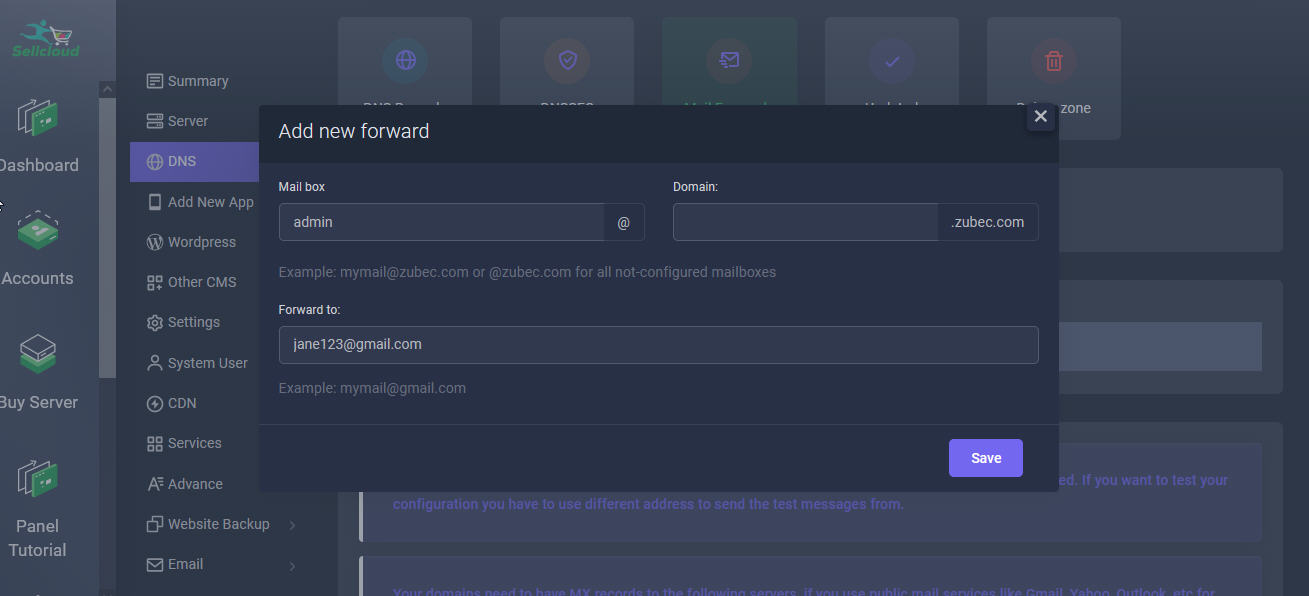
Step 23: Add Mailbox fields
In the popup form, (see image for help) in the Mailbox field, add text: admin. Then in the Domain field, leave blank for example.com. If you are using a subdomain, then add the text like example: sub1.example.com. (Make sure to add CNAME for a subdomain.) In the Forward to field, add your gmail or any mailbox address you have.
So any mail coming to admin@example.com will be forwared to your Gmail or any mailbox address you added here.
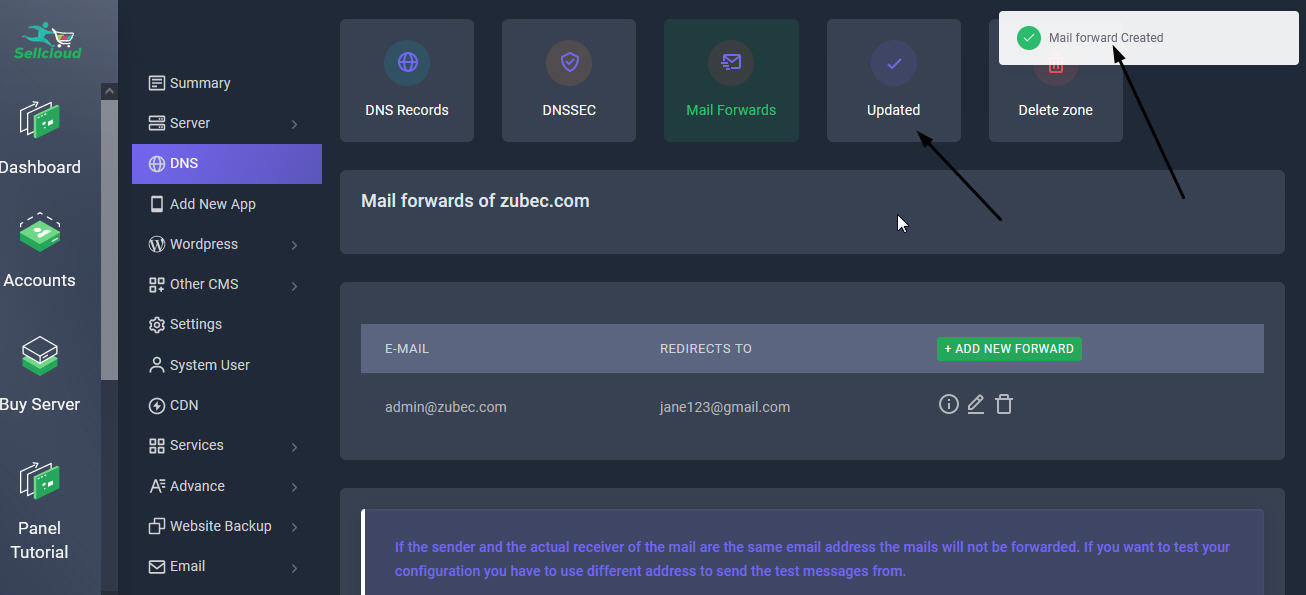
Step 24: Click Save
In the next step, click the save button. You will see a popup showing Success and Updated messages.
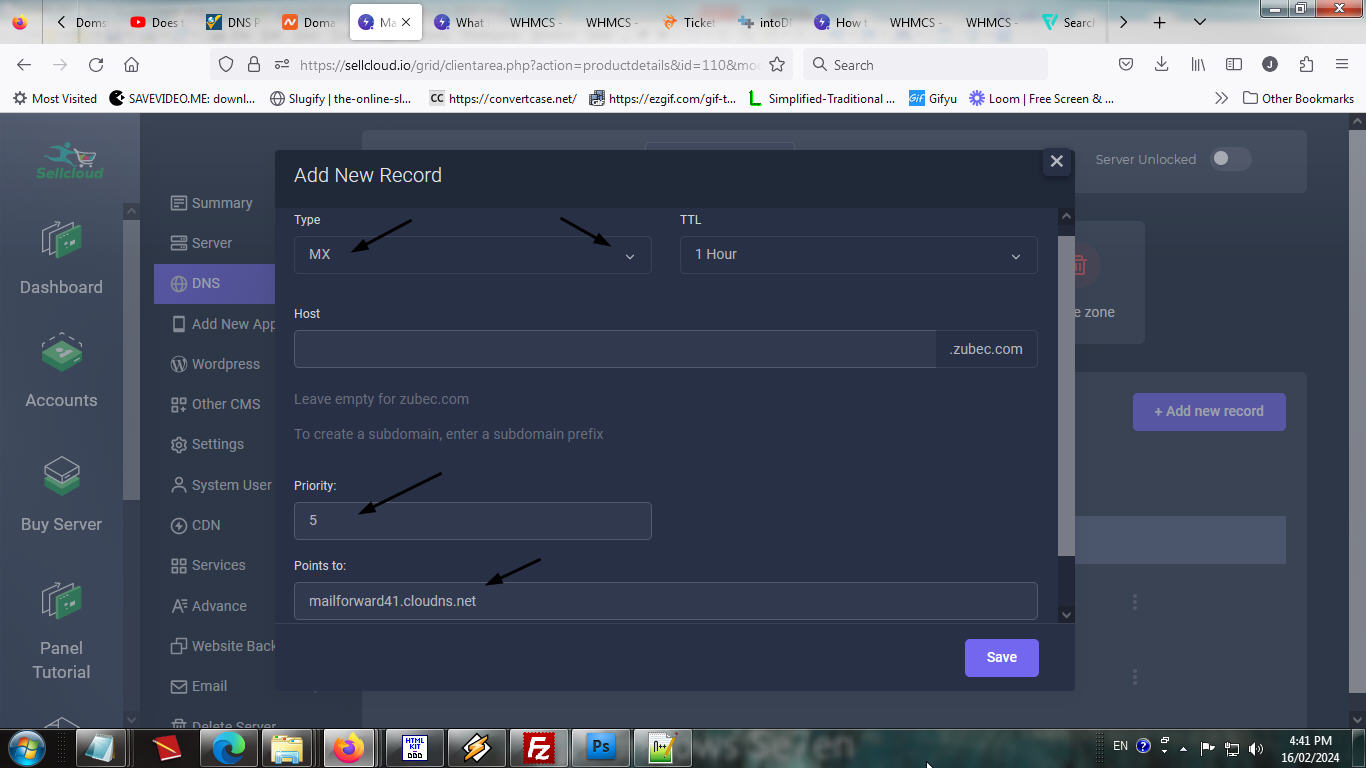
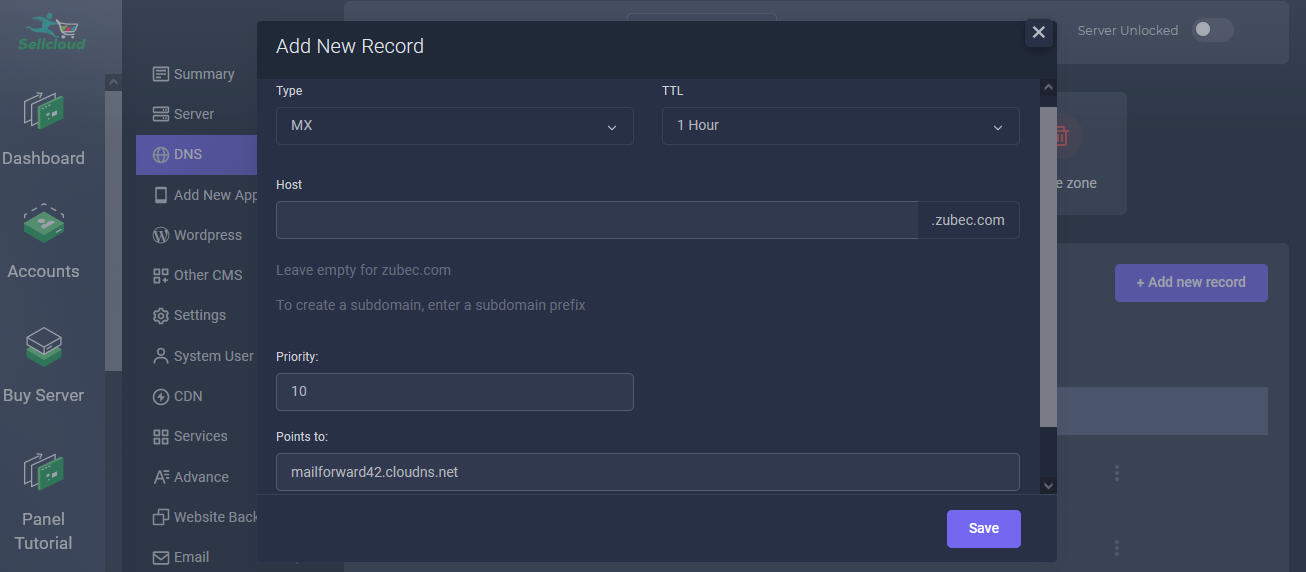
Step 25: Setup First MX Records
In the next step, First click on your DNS tab section and then click "Add New Record" button. You need to setup MX and SPF Records for your domain pointing to our Mail Forwarding Service.
For MX Record, add the following in your DNS tab. You need to do it twice as there are two domains below:
- mailforward41.cloudns.net
- mailforward42.cloudns.net
First MX Record, enter the details as follows:
Type: MX
TTL: 1 Hour
Host: yourdomain.com (Leave empty for yourdomain.com)
Priority: 5
Points to: mailforward41.cloudns.net
Step 26: Setup Second MX Records
Second MX Record, enter the details as follows:
Type: MX
TTL: 1 Hour
Host: yourdomain.com (Leave empty for yourdomain.com)
Priority: 10
Points to: mailforward42.cloudns.net
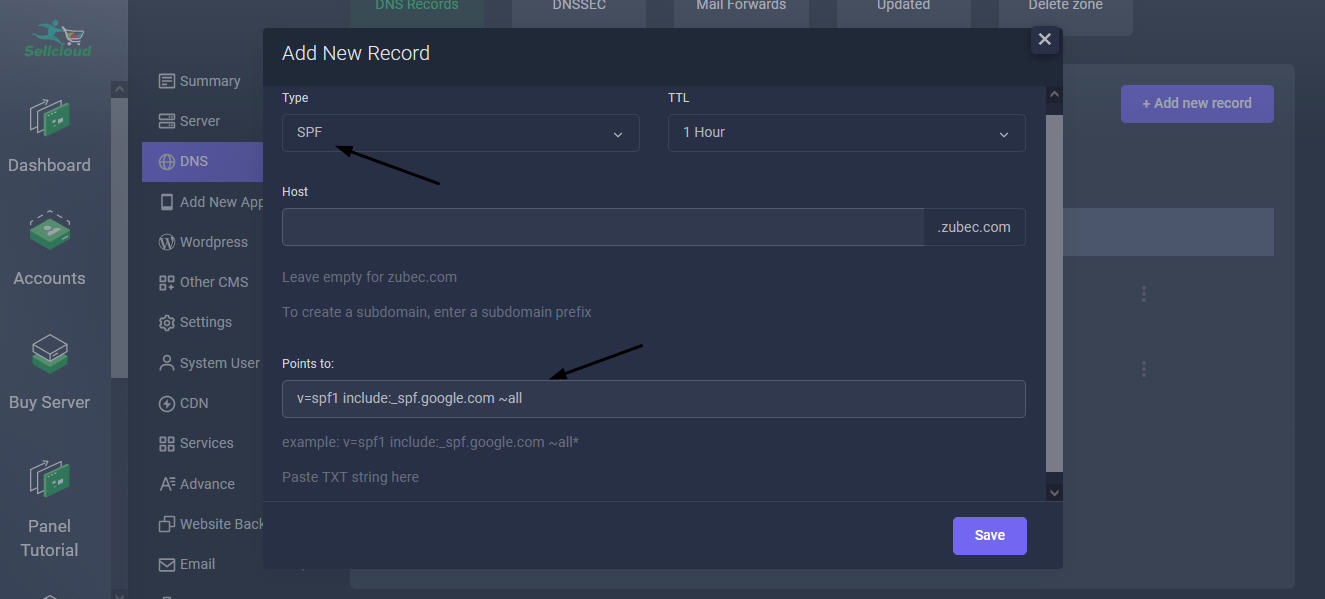
Step 27: Setup SPF Records
Next also create a new SPF Record so your mail doesn't end up in the spam folder. Go to DNS Records section and click on Add new record. Enter the details as follows:
Type: SPF
TTL: 1 Hour
Host: yourdomain.com (Leave empty for yourdomain.com)
Points to: (If using gmail)
v=spf1 include:_spf.google.com ~all. Now click "save" button. (For other mail services like Yahoo, Outlook, Zoho mail etc... you need to use different SPF Records. For more info click here)
(For example, the SPF TXT value should be for Zoho mail
v=spf1 include:zoho.comand for Microsoft Outlook).
v=spf1 include:spf.protection.outlook.com ~all
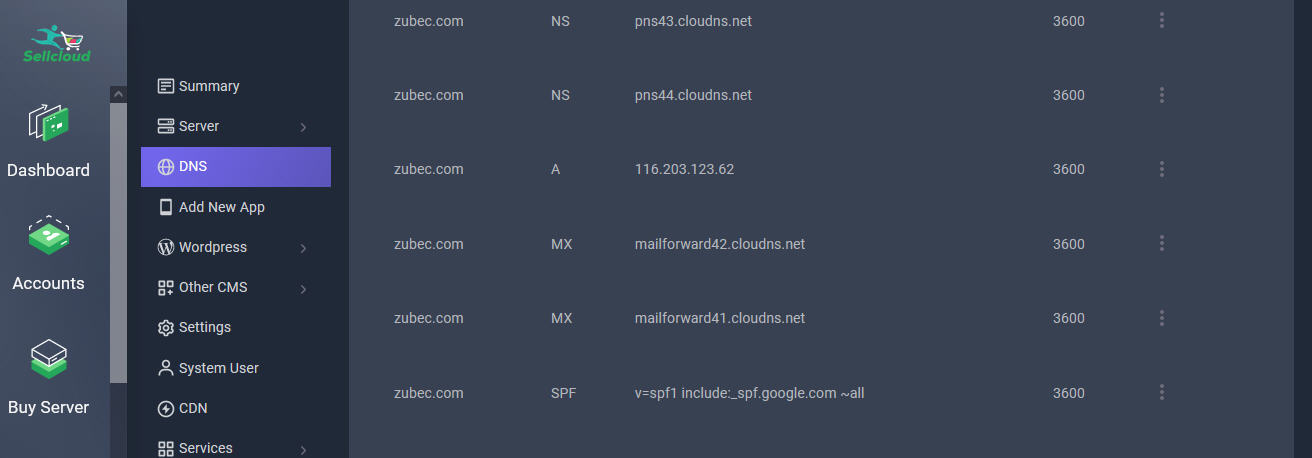
Step 28: All 3 Records Added
As you can see in the left image, the 3 records have been addded. It is now being propagated worlwide. Please wait for 15 mins to 1 hr for full propagation.

Step 29: Resend Mail
After 30 mins later, return to the SSLS.com dashboard and click "Resend Email" button.
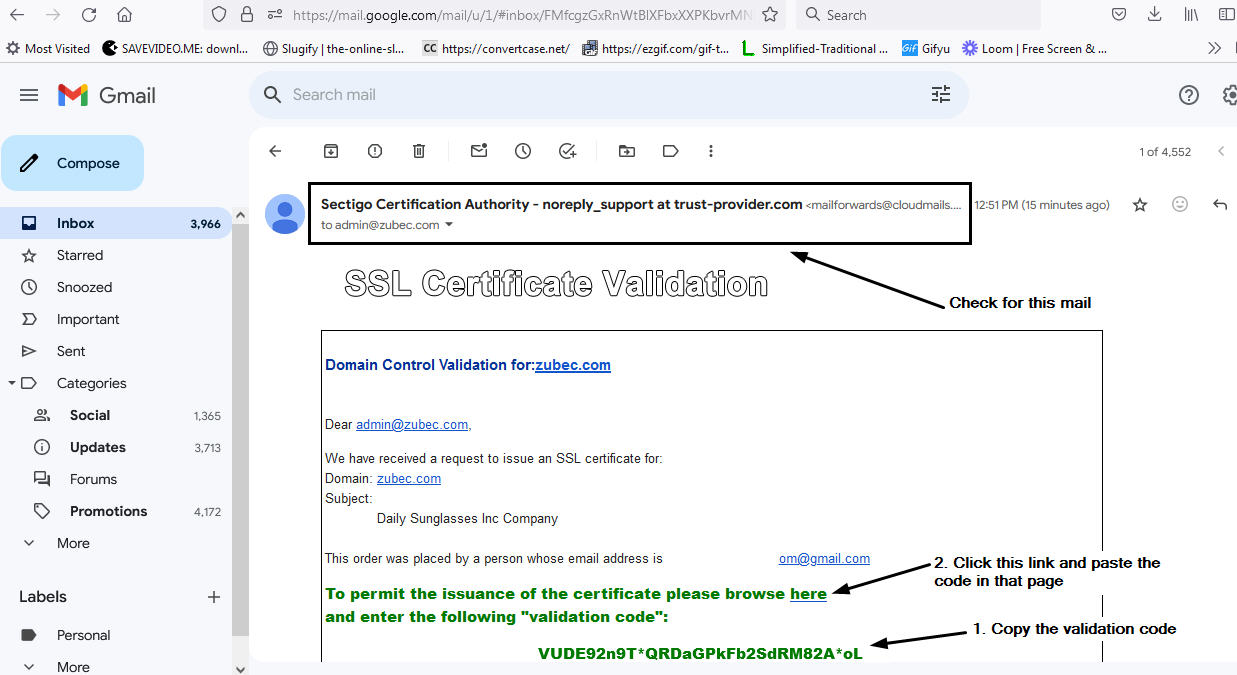
Step 30: Check your Gmail
In the next step, please check your gmail or other mailbox you added as forwarding for an email with a validation code from @trust-provider.com.
Copy the verification code and then click the link as shown in the left image. It will open a new page and paste the code there and click the NEXT buton
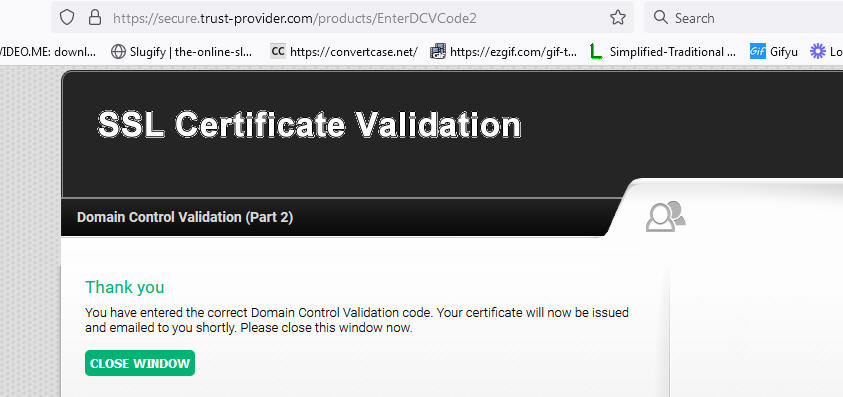
Step 31: Validation Done
In the next step, it will say "You have entered the correct Domain Control Validation code. Your certificate will now be issued and emailed to you shortly. Please close this window now." Close the tab.
Please wait for the SSL Certificate to be issued and emailed to you within 10 mins.
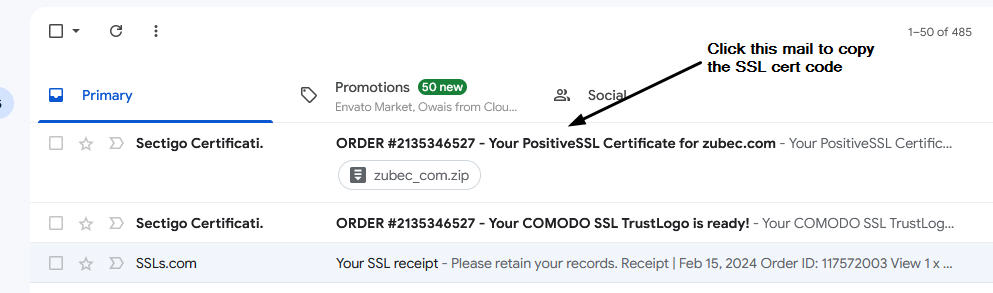
Step 32: Custom SSL Cert Issued
In the next step, check your mail. You would have received 2 new messages. Click the message with an attachment.
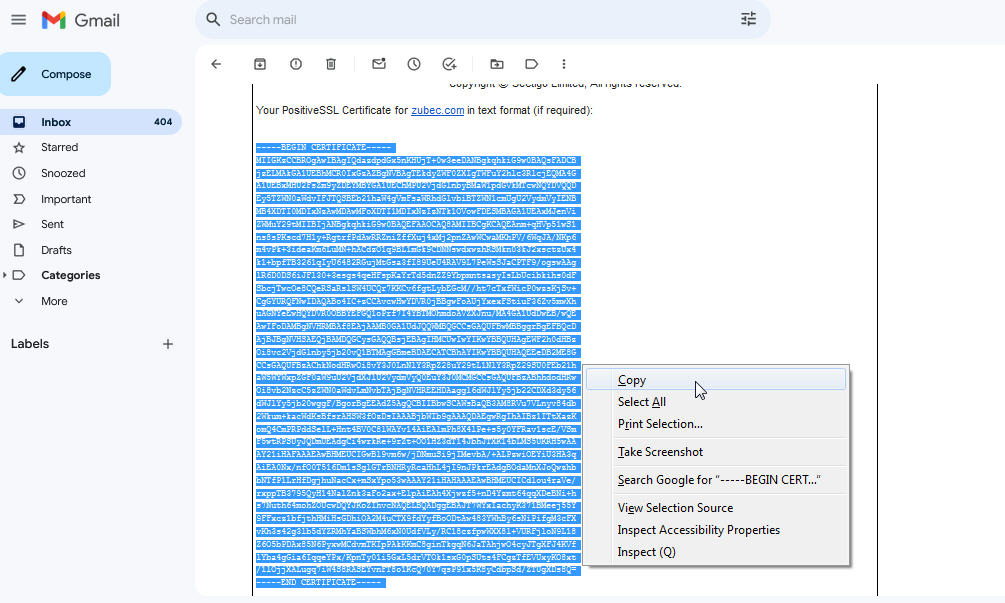
Step 33: Copy SSL Cert from your Email
In the next step, once you open the SSL mail, scroll down and copy the cert in text format (Your PositiveSSL Certificate for zubec.com in text format)
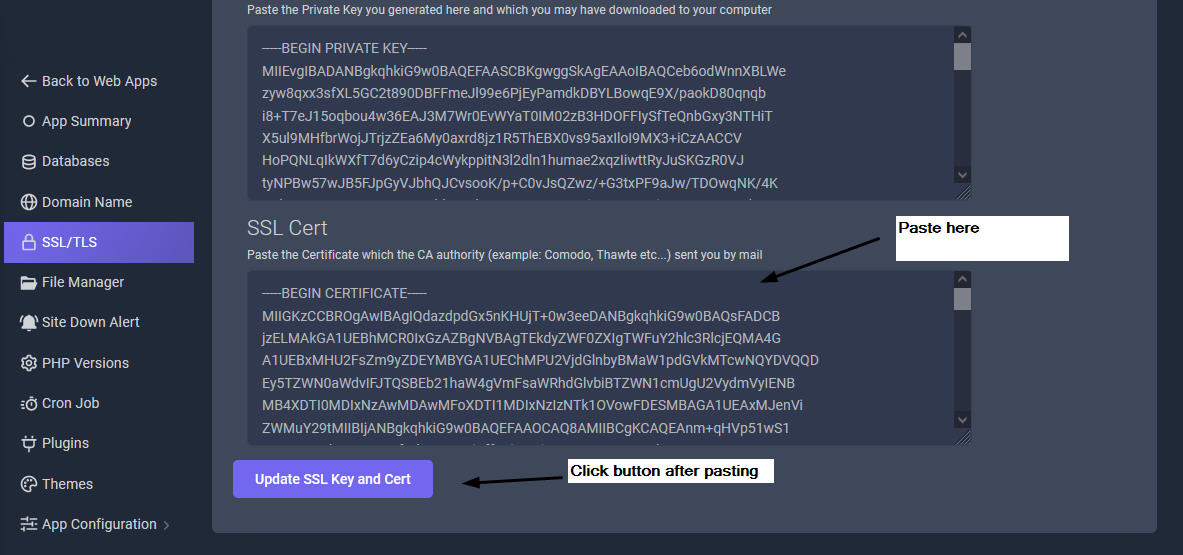
Step 34: Paste SSL Cert in SellCloud Panel
In the next step, go to your SellCloud admin panel, go to your app's SSL tab in SellCloud Dashboard > Products/Services > Your Server > Wordpress > Web Application > Your App > SSL
Then scroll down and click the "Add a custom cert or Generate CSR" button. Paste the copied SSL certificate in the blank field (SSL Cert) in the bottom. Then click "Update SSL Key and Cert" button
Step 35: Custom SSL Cert Activated
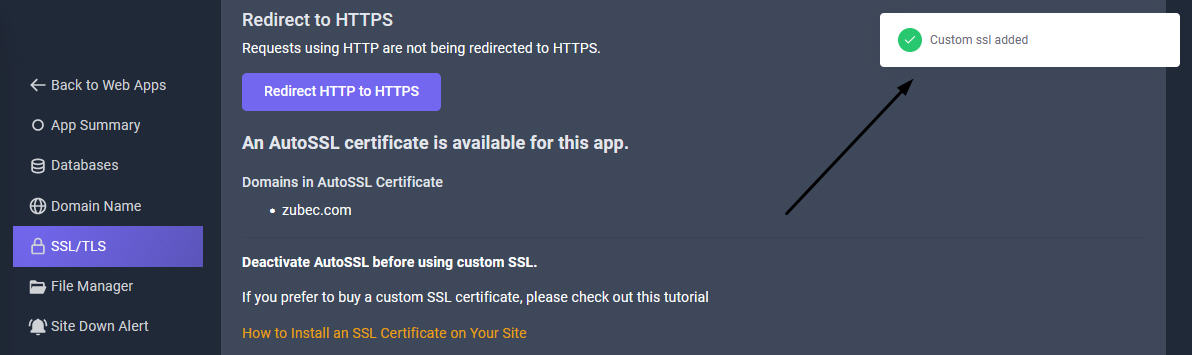
You will see Alert message that "SSL Cert Added"
Step 36: Refresh Your Browser Page
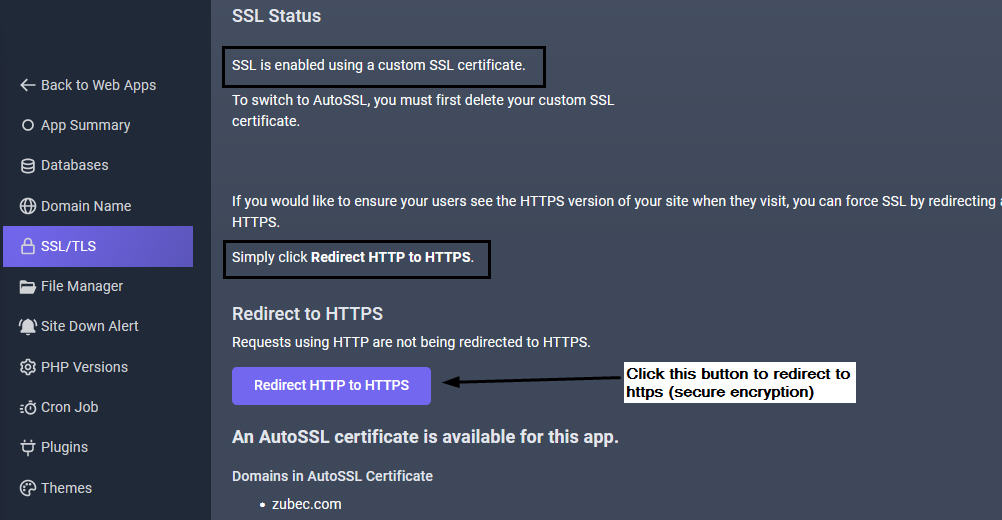
In the next step, refresh your browser page. You will see SSL Status: SSL is enabled using a custom SSL certificate.
Next click the "Redirect HTTP to HTTPS" button. This action will force all your pages to be served using the SSL Secure Encryption.
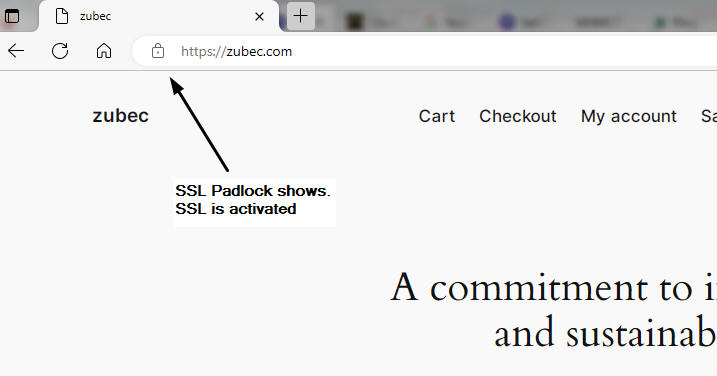
Step 37: Refresh your Website's Homepage
Now refresh your website's homepage in the browser. You will see the SSL padlock. It means SSL is activated using a custom SSL certificate.
That's all. Thank you