
It also means that you don't just have to know how to configure the software. It also requires that you are an expert in server security, mail server reputation and deliverability, anti-spam tooling, and, depending on your needs, potentially push notification management, search tooling, and a web client. If you have a low reputation score, your mail is less likely to be delivered to its destination because the recipient's mail provider thinks you're probably just another spammer. Below is a guide to setting up a free professional email hosting on cloud-based platform.
Every business needs a professional email address for its team members. However, new businesses may not have the funds to invest in paid email service providers such as Google Workspace, Outlook for business, Yahoo and others.
If you're in a similar situation, then worry not, we have you covered! Today, we introduce a free business email provider called Zoho Mail.
With Zoho Mail, you can set up and create up to five professional business emails for free! Hence, without further ado, let's understand how you can leverage this free business email service.
Free ZOHO Mail Box
- Up to 5 users per domain.
- mail@yourdomain.com
- 5GB storage space per user
- 25MB file attachment limit.
- Web & mobile app access.
Get started with Zoho Mail for FREE here:
Getting Started with Zoho Mail The Forever Free Plan
Click here to sign up:
As you might've noticed - you still need a domain name (more on that later). Click 'Sign Up Now' under the 'Forever Free Plan'. Now, enter the following personal information:
- Name
- Email Address / Mobile Number
- Password
Feel free to go through Zoho Mail's privacy policy and terms of services before hitting 'Sign Up'.

Verification OTP
Depending on whether you used email or phone number to sign up, you'll receive a verification OTP (check your phone or email address for this code). Go ahead and paste that code. Click 'Verify'.
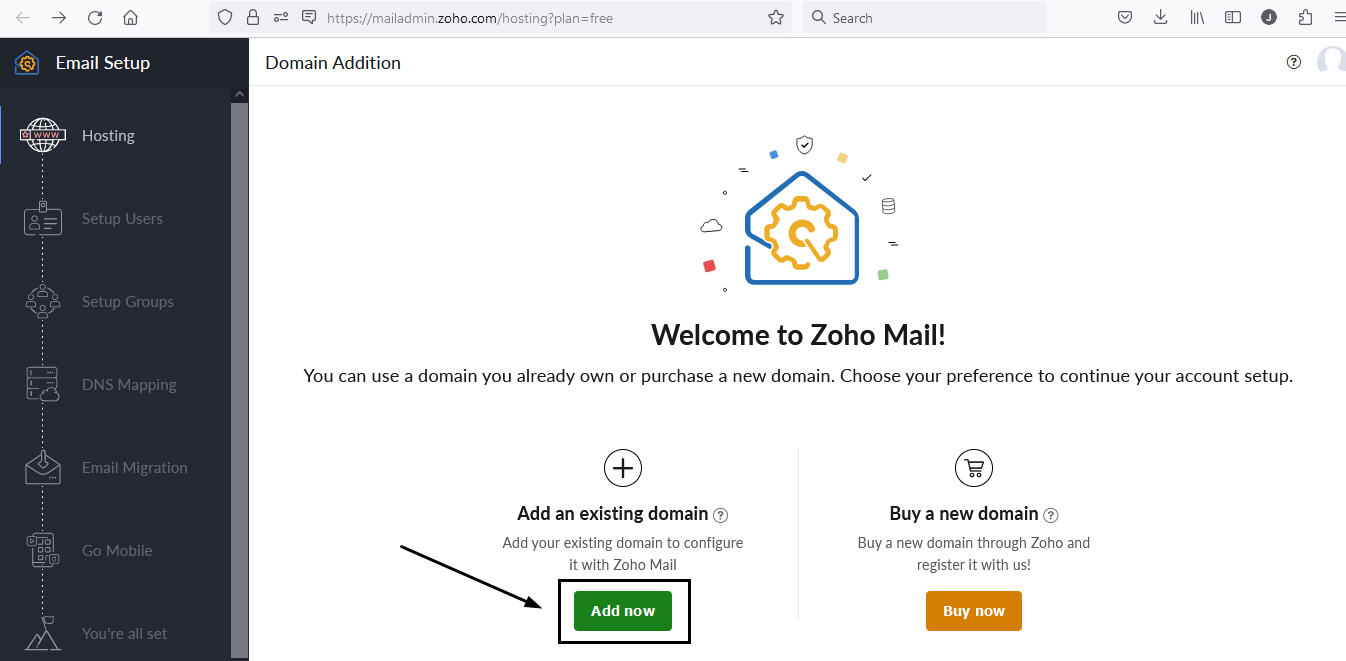
Sign up with a domain I already own
You will be redirected to a new page. If you don't have a domain name for which you want to create a zoho free email account, just choose "Buy a new domain for my business" and follow the on-screen instructions accordingly. In my example, I select "Sign up with a domain I already own," as I already own a domain.

Add a domain
Add a domain you already own to continue your account setup.

Domain Added
After successfully adding your domain, proceed to verify your domain.
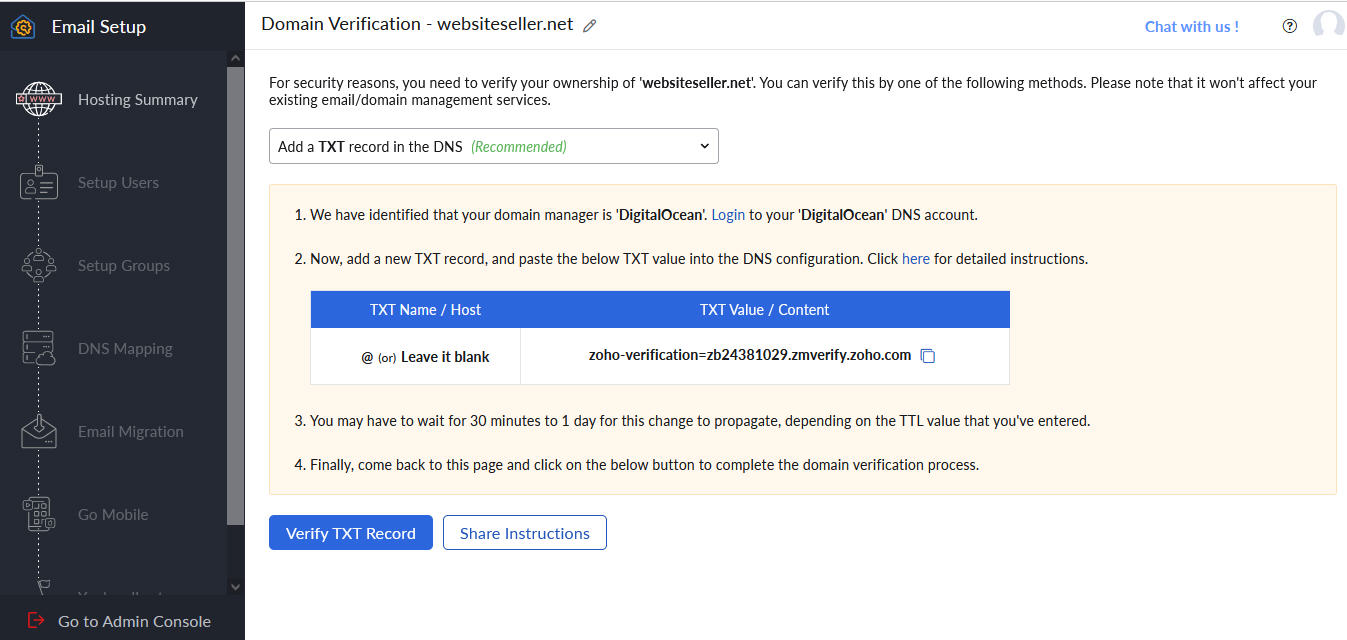
Verify Domain Ownership
You can choose your authentication method - TXT, CNAME, or HTML, by accessing the drop-down menu. Note: Before verifying the ownership of your domain, check if the domain name you provided is correct. In case of any misspellings or any required changes, click the Edit icon and make the required corrections.

Verify the domain by using three methods
Zoho Mail allows you to verify the domain by using three methods:
- CNAME Method
- TXT Method
- HTML Method
1. TXT Method
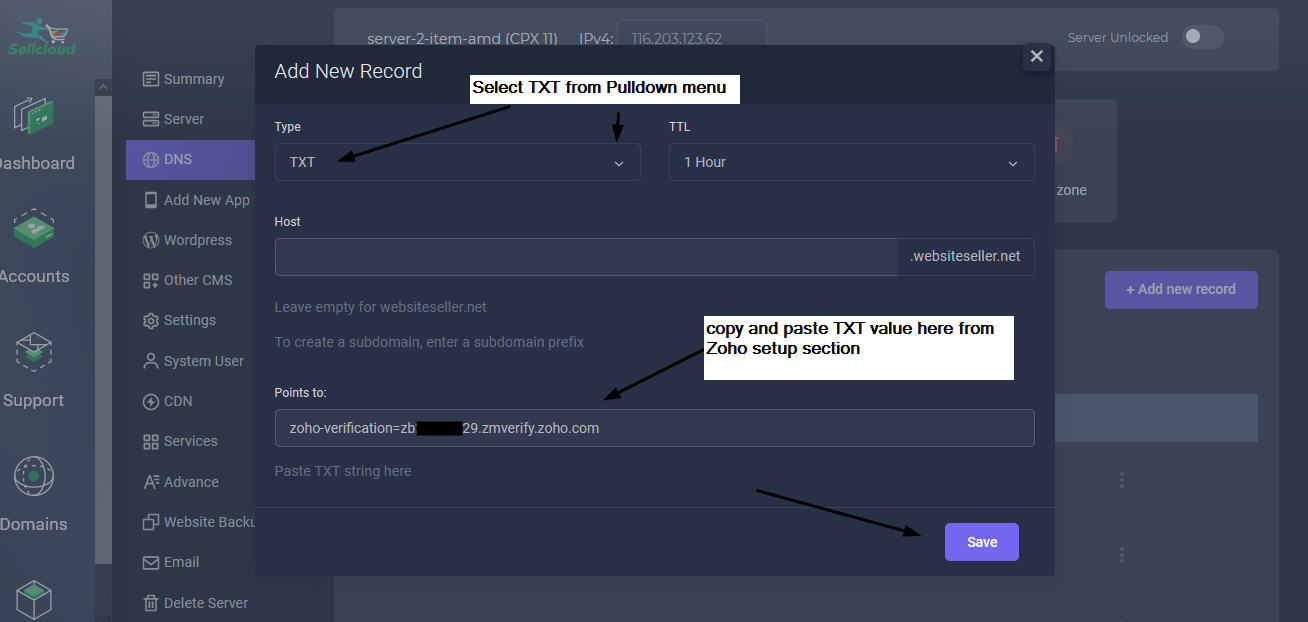
In order to verify your account using the TXT method, you will need access to your Domain Registrar's DNS page. Select Add a TXT record in the DNS from the drop-down at Zoho's Domain Setup page.
DNS record page
- In a new browser tab, sign in to your Domain Registrar's account.
- Navigate to your Domain Management Page or the DNS record page.
- Locate the option to add a TXT record, then click Add and select TXT from the drop-down list.
- To add a TXT record, you will need information for the Host and Value fields (the title of the field may vary depending on the provider). You will find these details at Zoho's Domain setup page.
- For the Host field, you can either leave it blank or enter "@" or give your domain address (for example: "websiteseller.net")
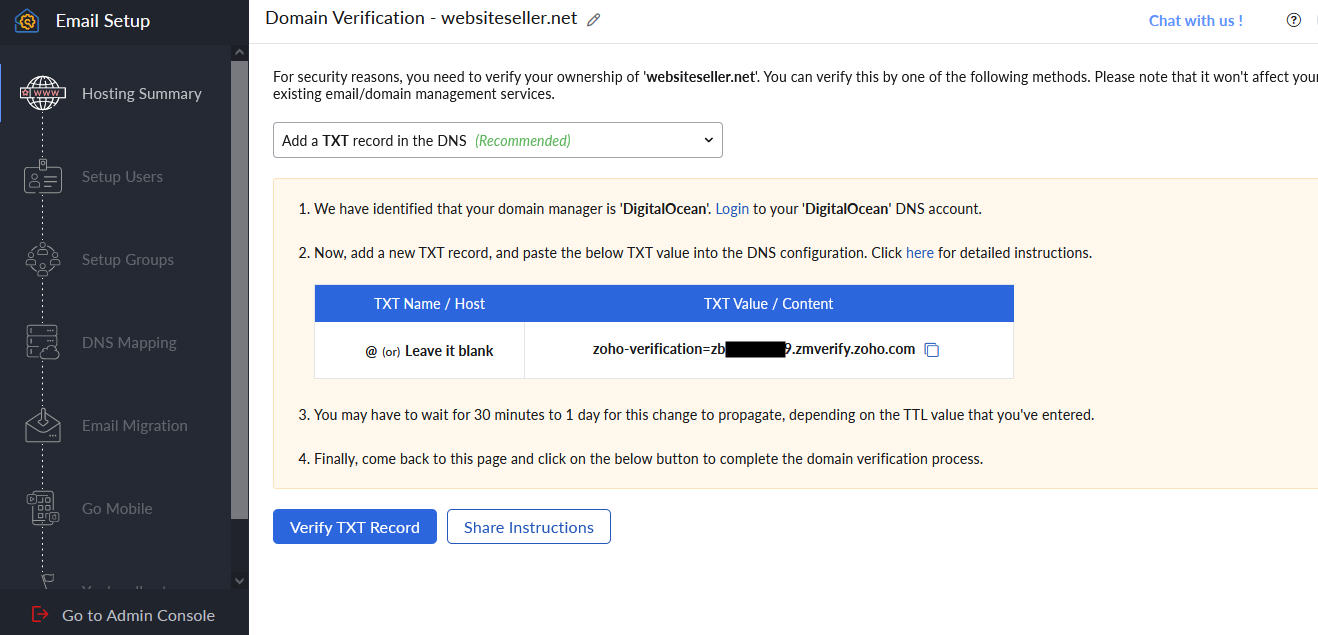
- For the Value field, copy the value "zo**-ve**********=zb1*******.zm******.z***.c**" (this will be unique for each domain) from Zoho's Domain Setup page and paste it into the TXT Value field. TXT-verification
- Once done, click Save.

Verify TXT Record
Wait for an hour or two before clicking the Verify TXT Record button at Zoho's Domain Setup page.
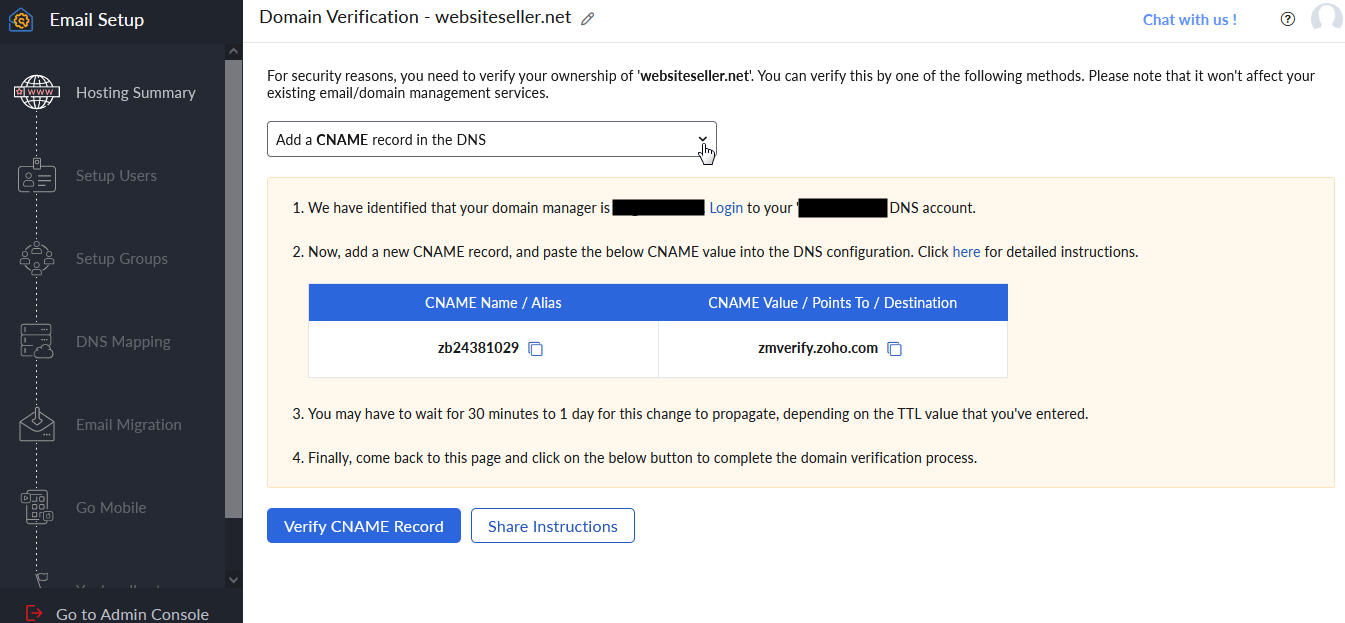
2. CNAME Method
Choose Add a CNAME record in the DNS from the drop-down at Zoho's Domain Setup page.

In order to verify your account via the CNAME method, you will need access to your Domain Registrar's DNS page.
- Sign in to your Domain Registrar's account.
- Navigate to your Domain Management Page or the DNS record page.
- To add a CNAME record you will need data for the Host and Value field (the title of the field may vary depending on the provider). You will find these details on Zoho's Domain setup page.
- For the Host field, copy the value "zb15*****4" (this will be unique for each domain) from Zoho's Domain Setup page and paste it into your domain's DNS page. CNAME-verification
- For the Points to field, enter "zmverify.zoho.com."
- If TTL is editable, choose the shortest amount of time available to get faster verification.
- Once done, click Save. CNAME-verification
- Wait for an hour or two before clicking the Verify CNAME Record button at Zoho's Domain Setup page.
Locate the option to add a CNAME record, click ADD, and select CNAME from the drop-down list. CNAME-verification CNAME-verification
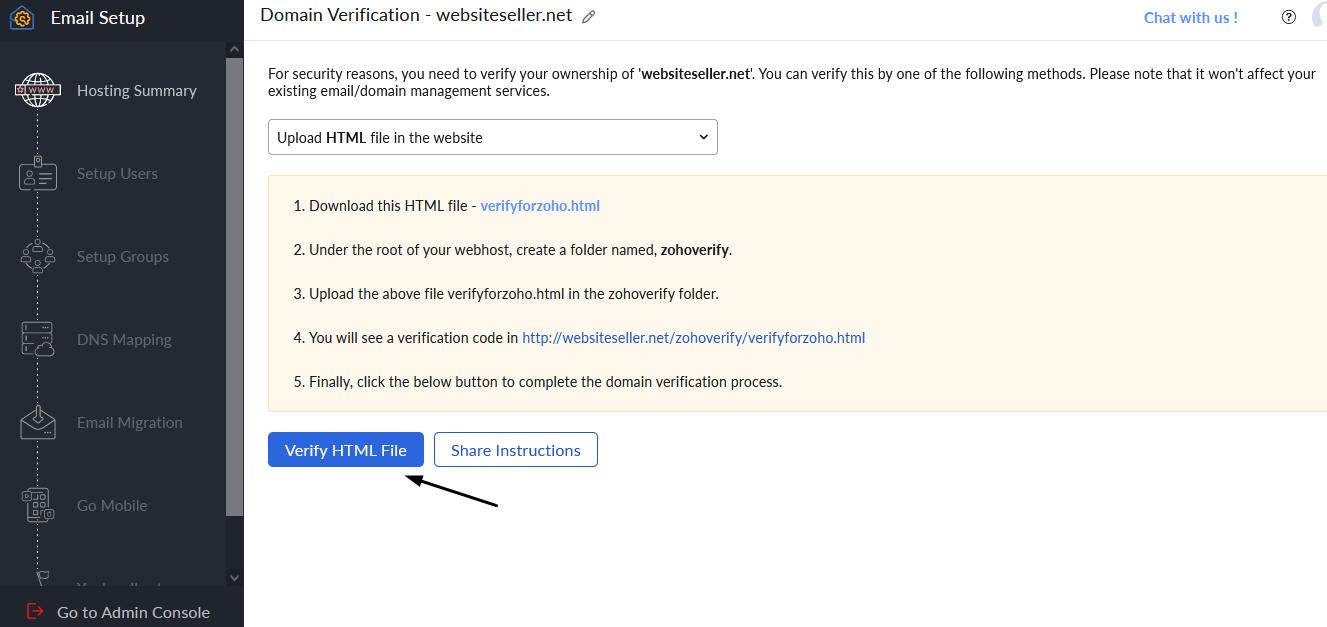
3. HTML Method
- Download this HTML file (from Zoho panel)- verifyforzoho.html
- Under the root of your webhost, create a folder named, zohoverify.
- Upload the above file verifyforzoho.html in the zohoverify folder.
- You will see a verification code in http://websiteseller.net/zohoverify/verifyforzoho.html
- Finally, click the below button to complete the domain verification process.
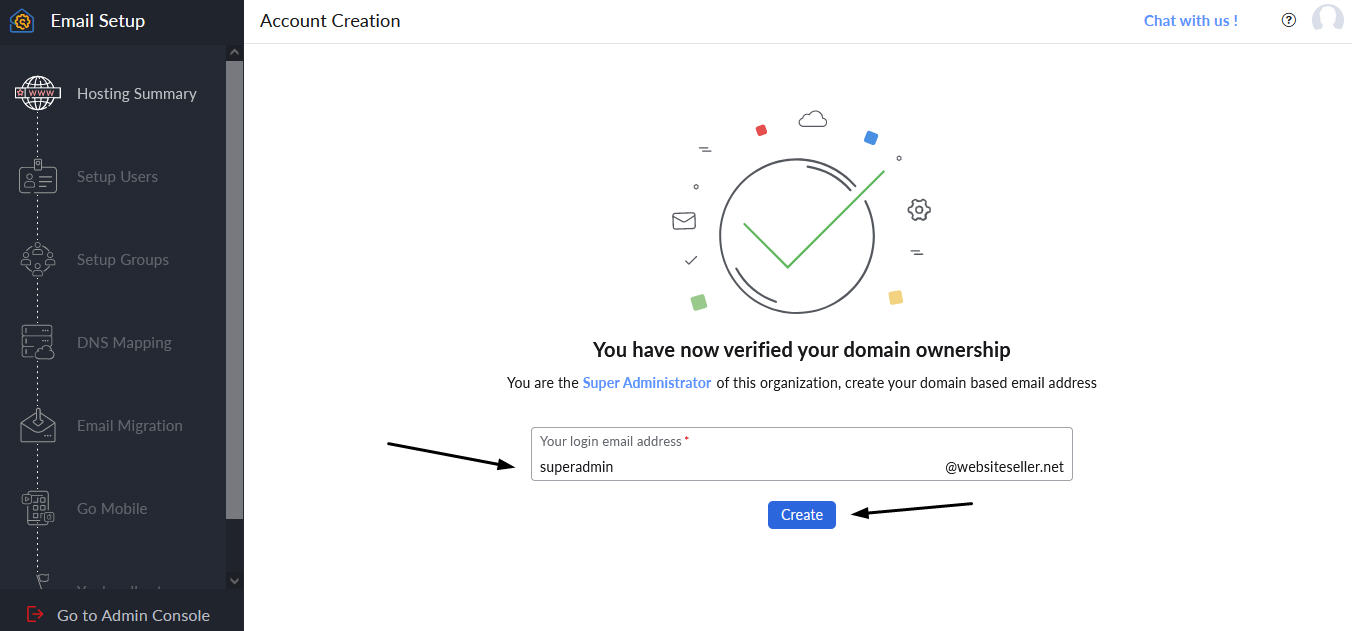
Add Users to your organization
After successful domain verification, you will be asked to provide a name to create the first user of your organization. Note that the first user you create will become the super administrator by default. The super admin will have all the privileges across all users who are added to your organization. Upon giving the user name, click Create button.

Adding the super admin
After adding the super admin, you will be taken to the Users page where you can start adding users to your organization. Adding users in Zoho Mail can be done in multiple ways, depending on your convenience.
- Add Users one by one.
- Import Users using a CSV file.
- Invite a user to be a part of your organization.
- Import from G Suite
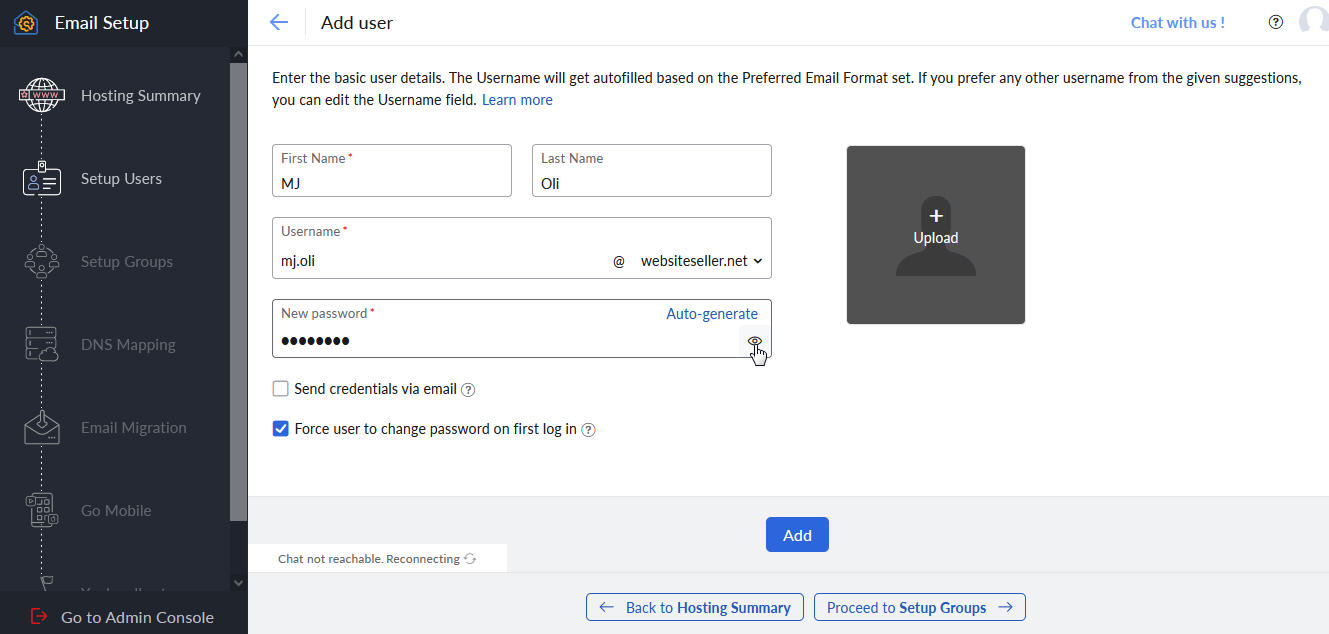
Add User(s)
Note: When you add a user, you are creating an individual account for them in your organization. You will be providing the user with a unique professional email address and password using which the user can access their account.
- Add-users
- Enter the desired first name, last name, and username. You will also be required to provide a password, using which the user can log in later.
- You can also check the Force user to change the password during the first login option, according to your security requirements.
- Click Add to finish creating the user account in your organization.
Note: If you check the above option, the user will be prompted to change the password of their account during their first login attempt. The user will not be able to enter or access their account before changing the password.
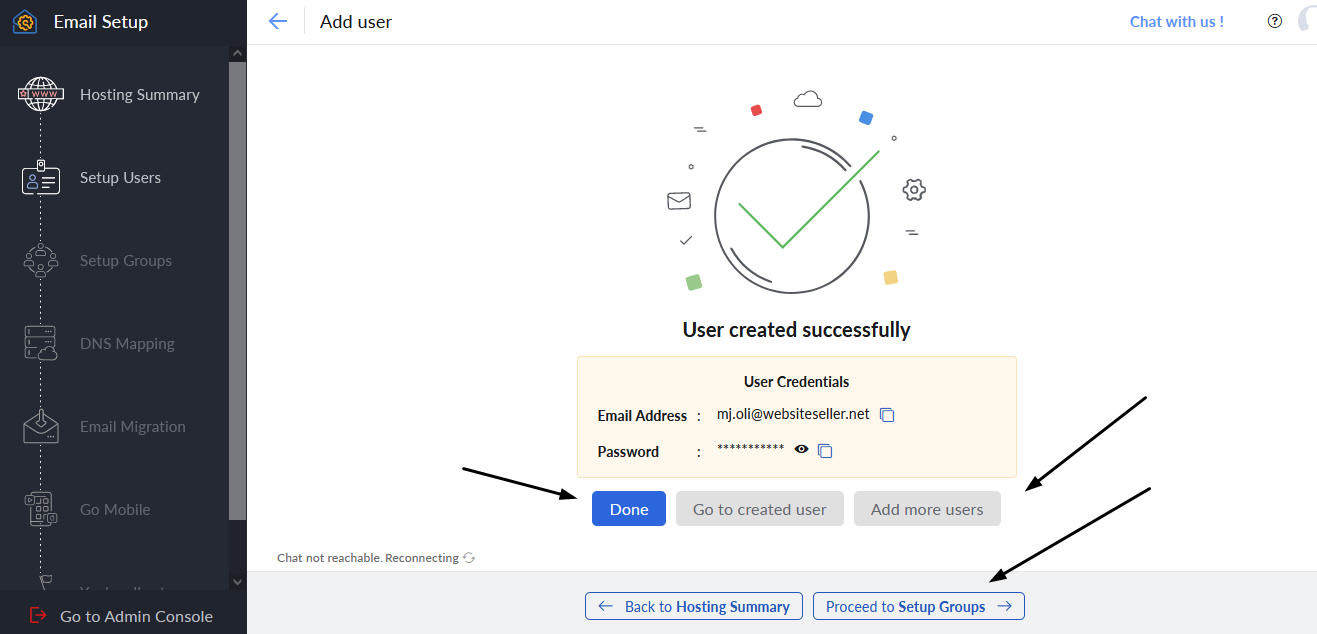
User Added
Redo the same steps to add as many users as you need. You can also check the Force user to change the password during the first login option, according to your security requirements. Note: If you check the above option, the user will be prompted to change the password of their account during their first login attempt. The user will not be able to enter or access their account before changing the password.
If you are done in adding users, then click Proceed To Groups button
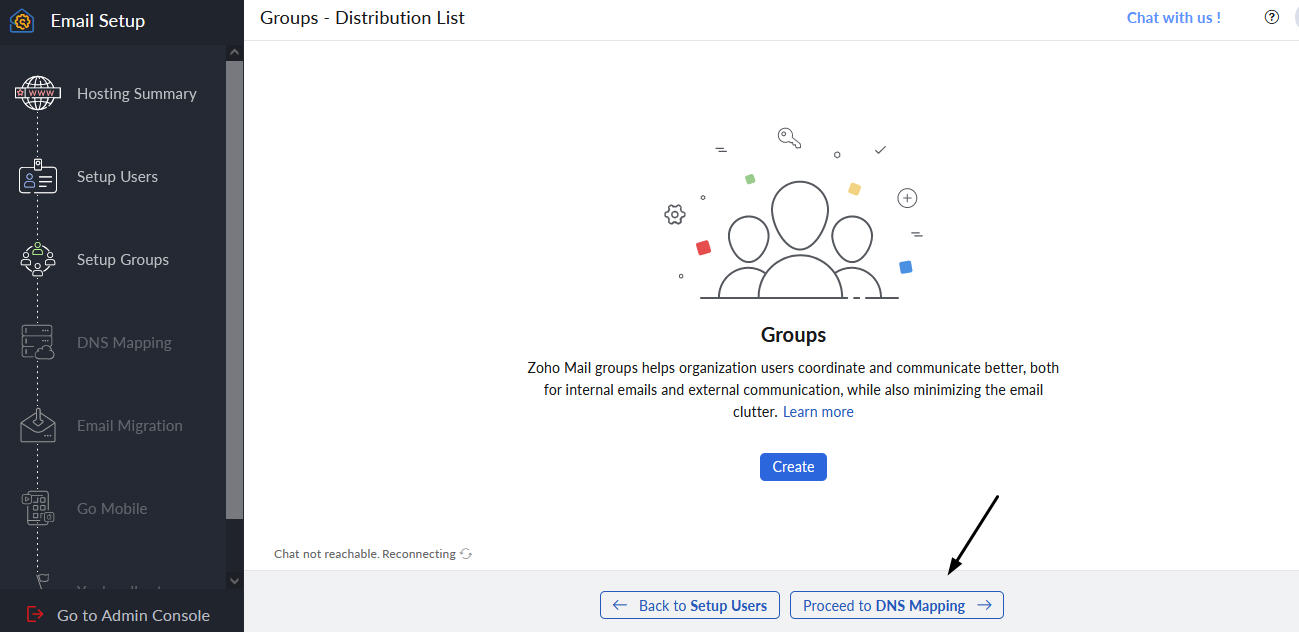
Groups
Groups or Distribution Lists are common email addresses shared by a set of users with a common purpose. When an email is sent to the group account, a copy of the email gets delivered to all the individual members of the Group.
If you don't want to create "Groups" or do later, click Proceed to DNS Mapping button
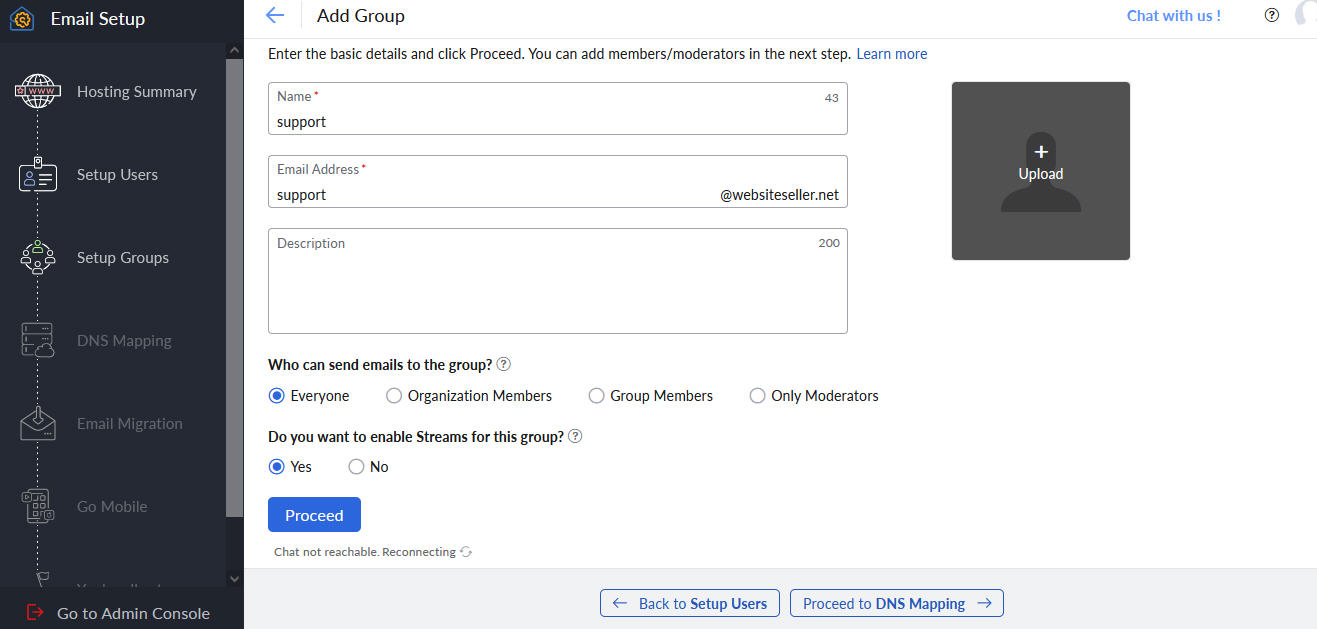
Create a Group
To create a group, please click this Zoho Groups tutorials
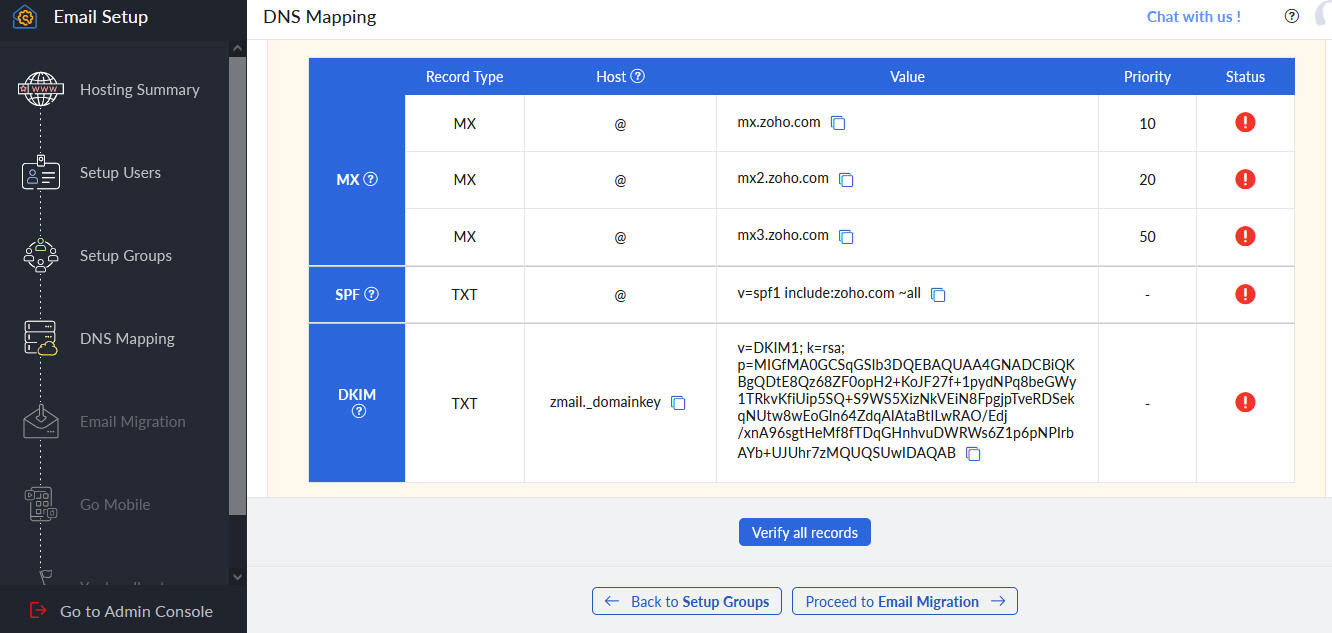
DNS Mapping
Mapping your emails to Zoho Mail is one of the most crucial steps in setting up your business email. You need to configure the MX records of your domain in the DNS hosting provider (DNS Manager) in order for the users and groups you've created to start receiving emails. MX Records (Mail eXchange) are the special entries in DNS that designate the email-receiving server of your domain.
We also recommend adding SPF and DKIM records to prevent email spoofing. Email spoofing is forging an email so that the email appears to be sent by someone other than the actual source. Adding SPF and DKIM records will ensure valid emails from your domain get delivered to your recipient and also prevent email spoofing.
- The MX, SPF, and DKIM records used below are generic and can change depending on the data center you are using Zoho Mail from. In order to avoid confusion, refer to the records displayed in your setup screen for your domain-specific MX, SPF, and DKIM records.
- The screenshots displayed below are from SellCloud DNS section and they may differ from your domain registrar's user interface.

Your Domain DNS Panel
Go to your SellCloud Panel and click the DNS tab. Click your domain listed there to enter it's records page.
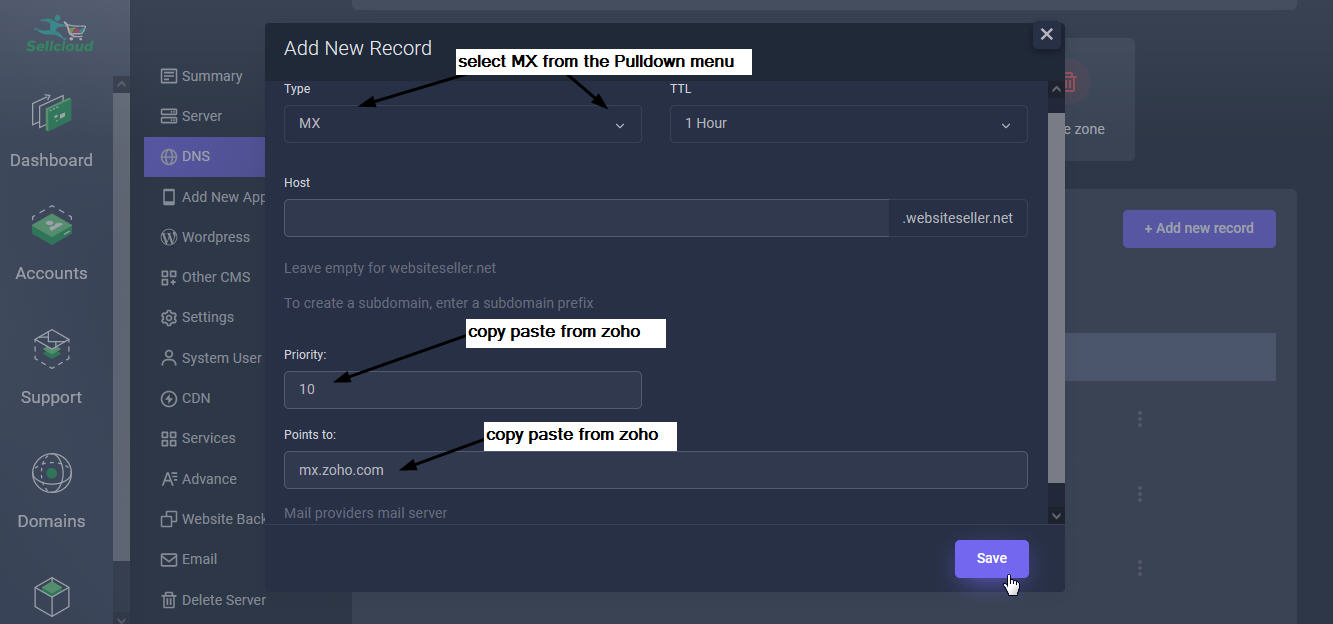
1. Add First MX Records
- To add the MX records, locate the option to add MX Records.
- If you have any existing MX record entries, it's important to remove them.
- Locate the option to add a new record and select that.
- Specify the Name/ Host/ Subdomain as "@" or leave it blank.
- Specify the Points to Value as "mx.zoho.***" for the first record and set Priority to 10 and click Save.
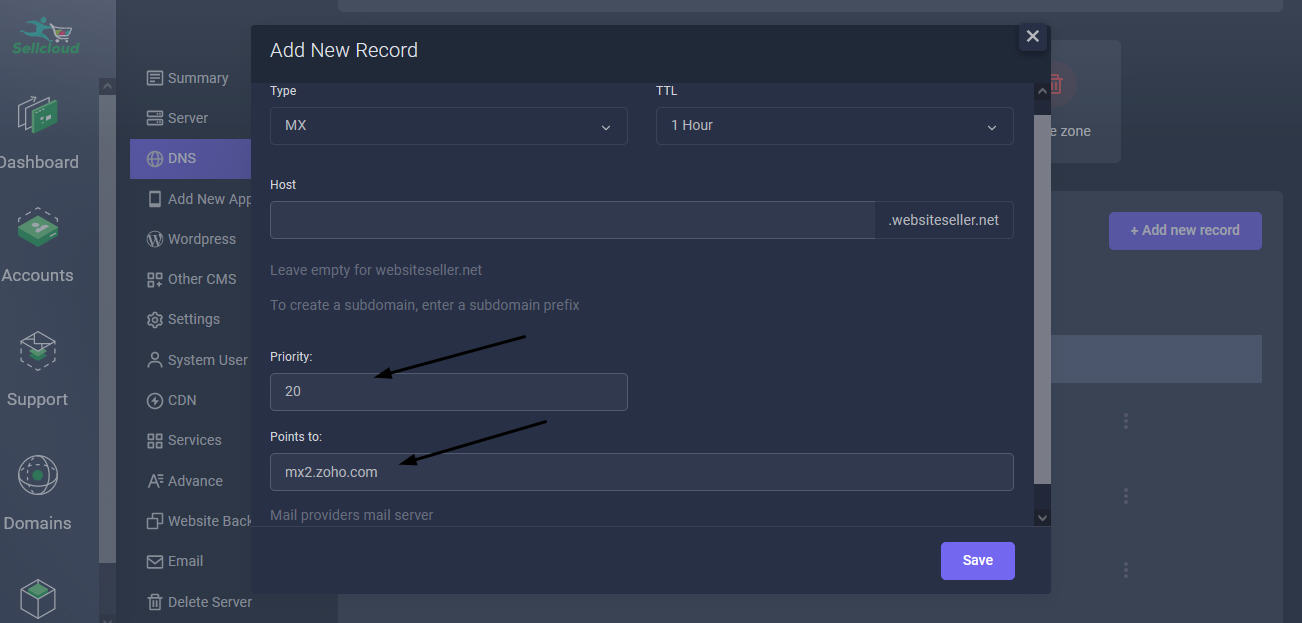
1. Add Second MX Records
Follow the same steps to add the second (mx2.zoho.***) MX records for your domain and set Priority to 20.

1. Add Third MX Records
Follow the same steps to add the third (mx3.zoho.***) MX records for your domain and set Priority to 50.

2. Add SPF records
To add the SPF records, locate the option to add a TXT record, then click Add and select TXT from the drop-down list. Specify the Name/ Host as Leave empty field or as "@" if using different DNS Registrar. In the TXT Value field, enter "v=**** include:zoho.*** ~all" and click Save. It may take anywhere between 4 to 48 hours for your SPF record to propagate. If there are multiple SPF records, verification will fail.
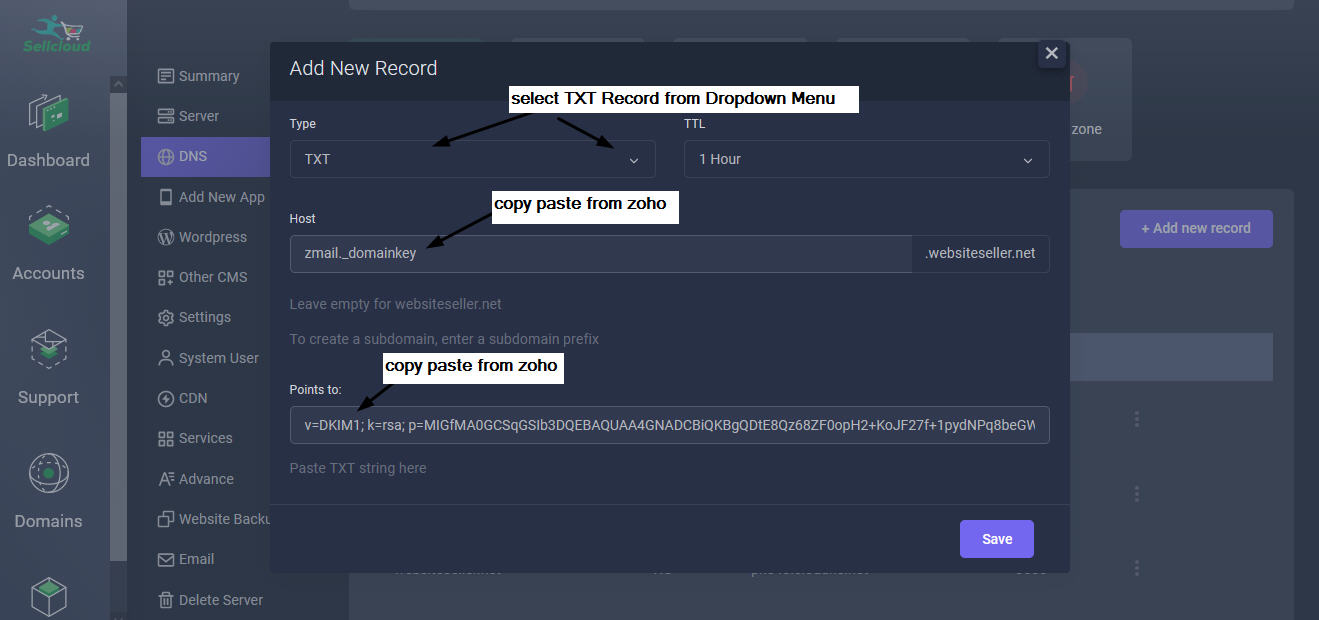
3. Add DKIM records
Go to your SellCloud Panel and click the DNS tab. Click your domain listed there to enter it's records page.
- To add the DKIM records, locate the option to add a TXT record, then click Add and select TXT from the drop-down list.
- For the Host field, copy the value "zoho._domainkey" (this will be different in the case of a different selector) from Zoho's Domain Setup page and paste it into your domain's DNS page.
- For the Points to/ Value field, copy the value "v=DKIM1; k=r**; p=***************....****" from Zoho's Domain Setup page and paste it in your domain's DNS page and click Save.
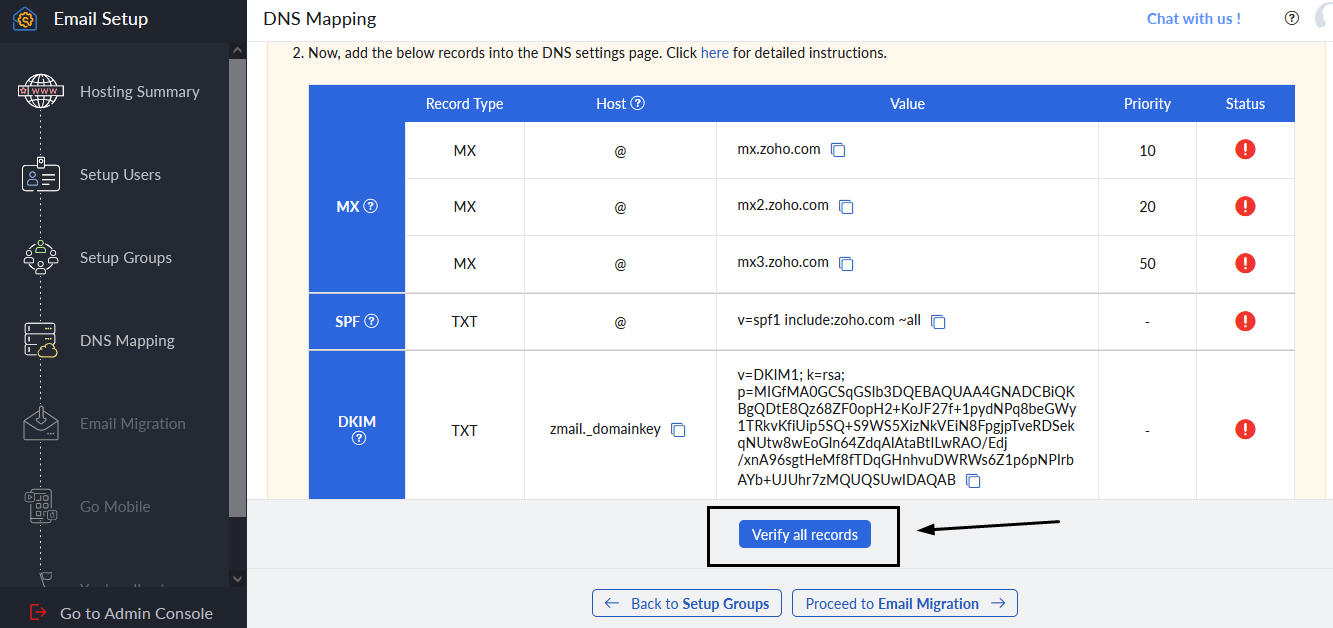
Verify All Records
After adding all three records, return to your Zoho Mail domain setup page and click Verify All Records. It may take about an hour or two for you to receive emails upon successful verification of your MX records and 4 to 48 hours for the propagation of SPF and DKIM records based on your Domain Registrar.
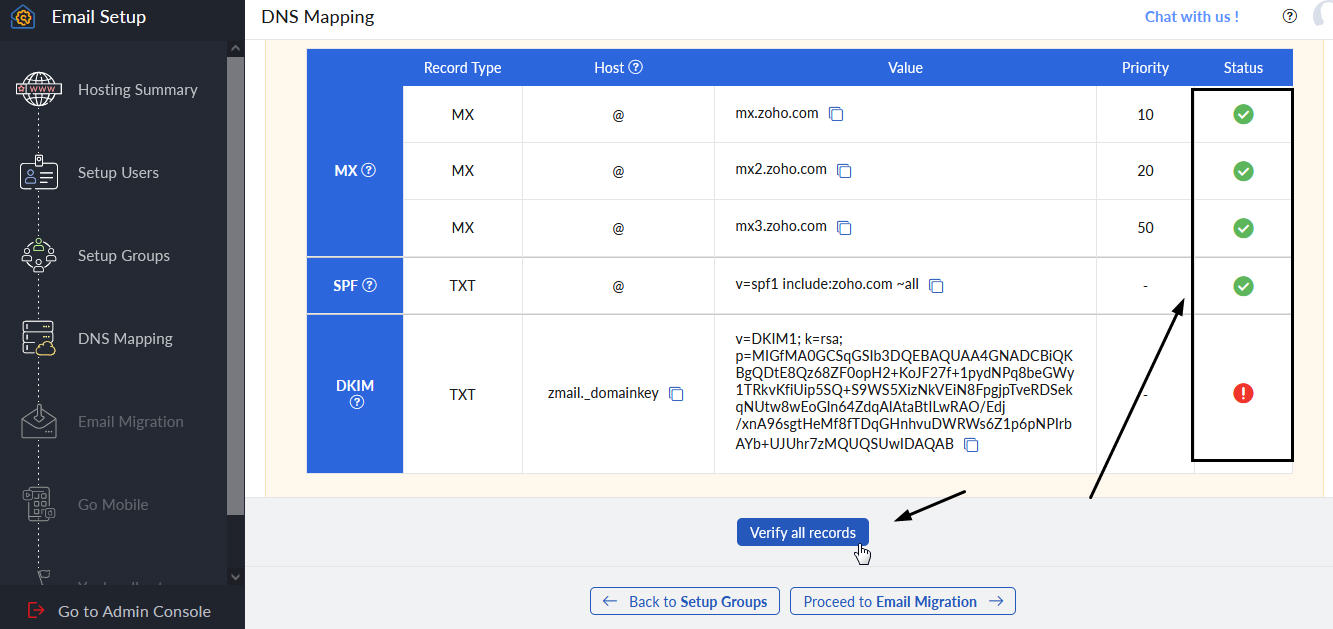
After 24 hrs in verification
After 24 hrs in verification, you can notice that all MX Records and SPF Record are verified. Only DKIM Record not verified. Give it some time maybe another 24 hrs.
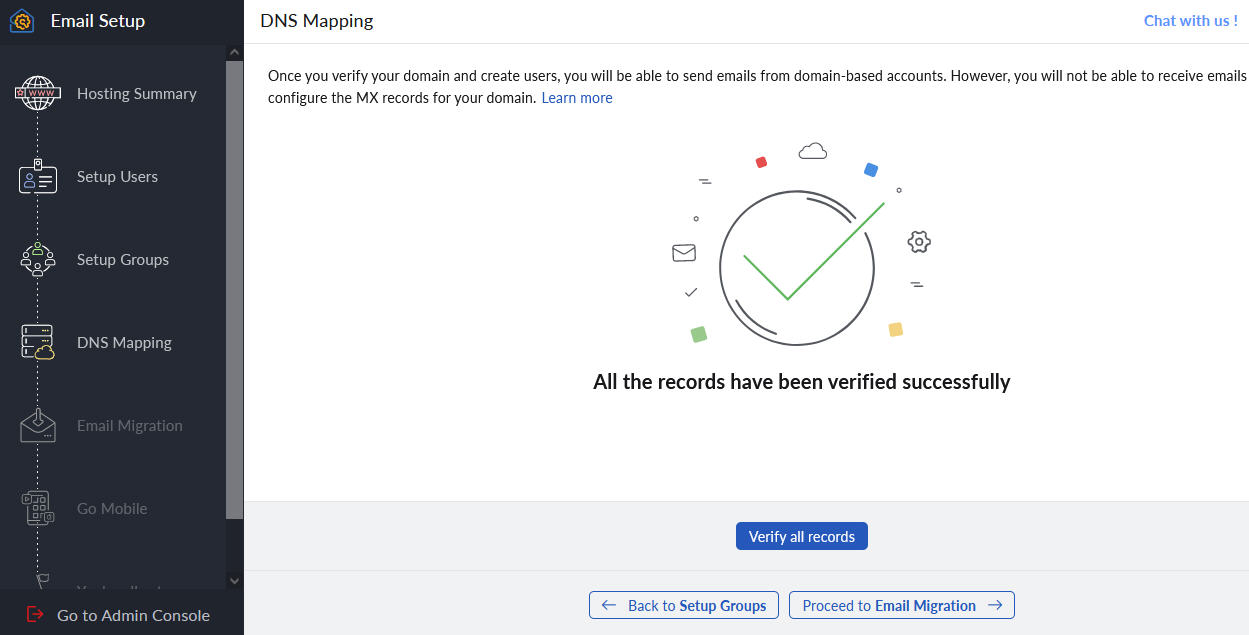
All Records Verified
After 48 hrs DKIM Record is aloso verified. Now All Records Verified

Mobile Access
Zoho Mail has multiple apps designed for administrators on the go and for users to check their email anywhere, anytime. Zoho Mail's apps are,
- Zoho Mail Admin App
- Zoho Mail mobile app
Zoho Mail App is designed to check your emails on the go, in the same way, you check your email from your webmail. You can create or accept events, set up reminders, browse through your attachments with this app. It ensures that you access emails at your convenience on your mobile. The app is available on both iOS and Android flavors.