1. Login to your Wordpress Control Panel
Once you have installed WordPress, there are still quite a few things you need to do to properly set up and launch your website. In this tutorial, we will share the most important things that you will immediately want to do after installing WordPress. If you are not sure how to login to your Wordpress Control Panel, click this guide here:How to log in to Wordpress dashboard
2. General settings: Site identity (email address, site language, time zone)
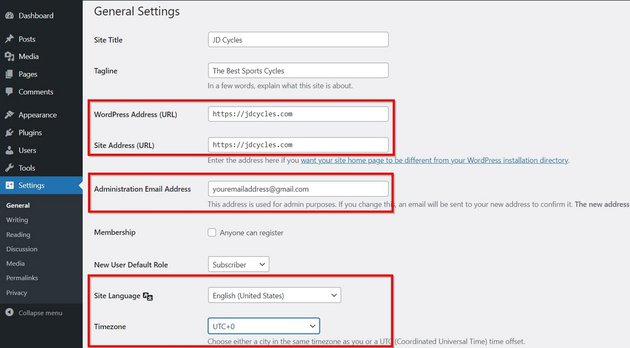
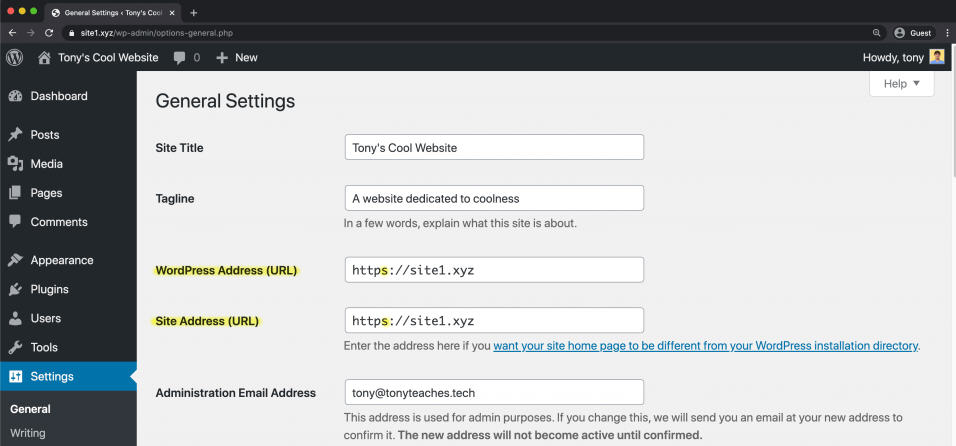
Go to Settings > General to change a few things. These settings are essential for your site's general functionality.
First and foremost, you'll want to change the site title and tagline for your website. From the WordPress admin dashboard, you can do this under Settings -> General. By default, these values are My WordPress Site and Just another WordPress site.
Site identity is essential for every website. The site title and tagline explain what the site is about. Plus, it is valuable for Search Engine Optimization (SEO).
WordPress Address URL and Site Address URL fields are filled by default when you install WordPress. Make sure the URLs are correct and similar in both fields.
You'll want to make this identical to the URL you bought when setting up your website.
You can change the Administration Email Address on this page which was added during installation. It's the primary email address WordPress will use to send alerts.
For example, when a user leaves a comment, WordPress will send a notice to this address.
It also becomes the default email address for the first user. If you need to replace it with another email address, you can.
You can also change your site's language by choosing one from the Site Language field related to your site.
And similarly, select a Timezone that is according to where your business address is located.
Save any changes you made.

Set WordPress Discussion/Comments Settings
Now, go to Settings > Discussion.
This can get confusing if you don't know what to do here. But just follow the left screenshot and you'll be good.
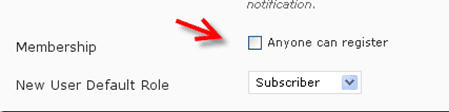
Enable/Disable User Registration
You need to decide if you are going to have a multi-author blog, or if you are going to be the sole author.
If you are going to allow guest posting, then be prepared to get a lot of spam registrations. However, you can fix that with the help of a plugin.
To allow this, tick off the "Anyone can register" box, and set the "New User Default Role" as "Contributor".
If you don't want people to register, don't tick the "Anyone can register" box.
Use HTTPS and Change WordPress Address and Site URL
On the same page, you'll see the WordPress Address URL and Site Address URL. If you have an SSL certificate installed (Sellcloud auto installs SSL certificate on all your sites), which is critical now since Google favors websites that use HTTPS, you'll want these URLs to start with https.

3. Writing settings (ping services)
In this tab only check out this function only. By default, WordPress only pings one service. But you can notify many more services by extending the ping list. Go to Settings > Writing and add in more services to the ping list. You can get a big ping list over here: WordPress ping list.
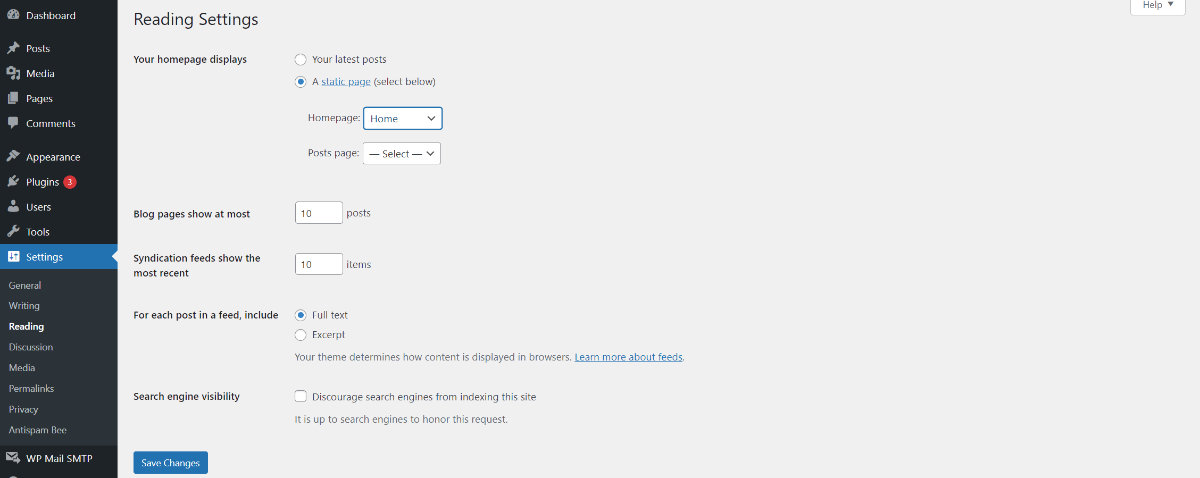
4. Reading settings: Use a Static Page as Your Homepage
In WordPress, you have the choice of displaying your latest posts on your home page or using a static page. A static page is a page you create under Pages > Add New, whose content does not update automatically - unless you add dynamic blocks.
The big advantage of a static page is that there are no limits to your creativity in designing it and the home page can be customized to any type of website - be it a corporate, blog, ecommerce website etc.
Under Settings > Reading, you can choose a page to act as the homepage.
Important: This option will not appear until you have created and published a page - besides the privacy page. To do this, simply go to Pages > Add New, enter the title of your future home page (usually Home) at the top and click Publish at the top right.Note: If you have purchased and installed our Woodmart Premium Theme or you installed any other theme, the Homepage will be ready

Select Blog as Post
Select Post Page from the pulldown and select Blog

Site Indexing
In this step, we make sure that Google, Bing, Yahoo, and other search engines can index your blog. I thoroughly recommend you turn privacy off, as you may forget to do it later which will be disastrous for your SEO. How to turn off privacy
- Go to Settings->Reading
- Check that Discourage search engines from indexing this site is
- un-ticked
- Click Save

5. Discussion Setting (essential settings to optimize commenting)
The Discussion page is where you can allow or disallow comments on your website. If engaging with users through comments is a part of your business plan, you can optimize it from here. Go to Settings > Discussion to open the page. You will notice lots of options and checkboxes under different segments.
Disable comments on your website
By default, WordPress publishes every comment that comes in.
You can change any of the following settings depending on your needs:
- To disable comments on your website, uncheck the option Allow people to submit comments on new posts.
- If you want to allow registered users to comment, check the option Users must be registered and logged in to comment.
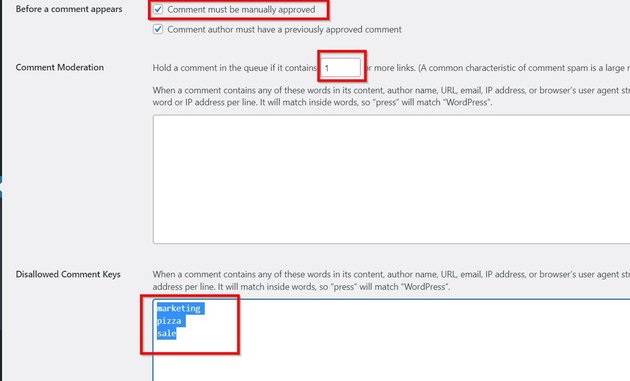
- To stop spam comments from being published automatically, check the option Comment must be manually approved.
- If you want to moderate a comment with at least one hyperlink, change the value from 2 to 1 in the Moderation Section section.
- If you know comments with specific words will always be spam, make a list of those words and put it inside the Disallowed Comment Keys field.

WordPress Blacklist Words
Note: The best anti-spam plugin for comment spam is auto installed on your Wordpress site by default by Sellcloud
In your WordPress admin dashboard, go to Settings > Discussion > and paste the following blacklist words into the Disallowed Comment Keys box. You can get a Blacklist Words list over here: Blacklist WordsPress the Save Changes button at the bottom of the page once you're finished.

6. WordPress Media Settings
This setting will greatly improve the way WordPress handles images. By default, WordPress create multiple sizes for every uploaded image. This is not a good practice. This will load up your blog with unnecessary files and your blog will quickly become bloated. Go to Settings > Media, and change all specs to 0 or use the screenshot to configure the proper settings.
I would also highly recommend that you add a plugin called Stop Generating Unnecessary Thumbnails. Just install the plugin and choose which of the image sizes you want to prevent from generating. (availabe from Sellcloud admin panel > Plugins tab

7. Permalink Settings: Change Permalink Structure
The default WordPress permalink is: http://yourdomain.com/p=123.
This permalink is short, but not friendly for search engines.
Go to Settings > Permalink and select "Post name".
Click "Save".
Now, when your URLs appear in search engines, some of the keywords will be visible. This will help you rank higher and get more traffic.
This will create talking (not cryptic), short URLs when creating pages and posts, which are preferred by both humans and search engines.It is something you need to fix before telling Google and other search engines to index your site. In our list of things to do after installing WordPress, we suggest you choose the permalink as early as possible.
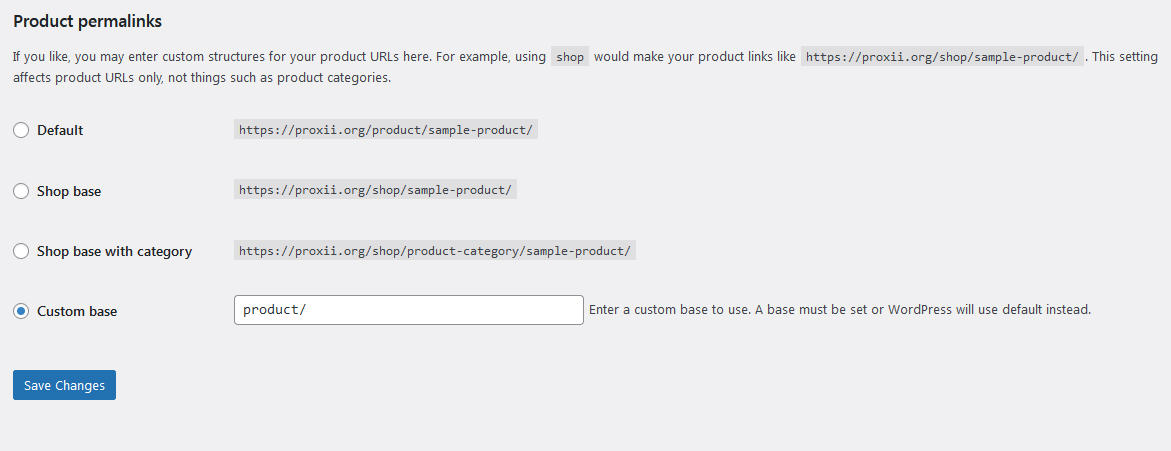
Product Permalinks: Best Permalink Structure for WooCommerce
The best WooCommerce URL structure is:
- Short
- Obvious to understand
- Hierarchical
Google sets criteria for good URLs for eCommerce stores:
- Include descriptive keywords
As these help Google understand the page. For example: /product/black-t-shirt-with-a-white-collar/ - Keep URLs short and clear
Google likes short URLs: "If we find a shorter and clearer URL, our systems tend to select that one." - Avoid duplicate URLs
If you change any of your WooCommerce permalinks, ensure they redirect correctly. - Remove anything unnecessary
Only keep what's needed. Google recommends removing "irrelevant parameters" from permalinks. - Use a logical hierarchy
If it's intuitive for a human reader to understand categories, tags, and product pages, Google will understand it too.