
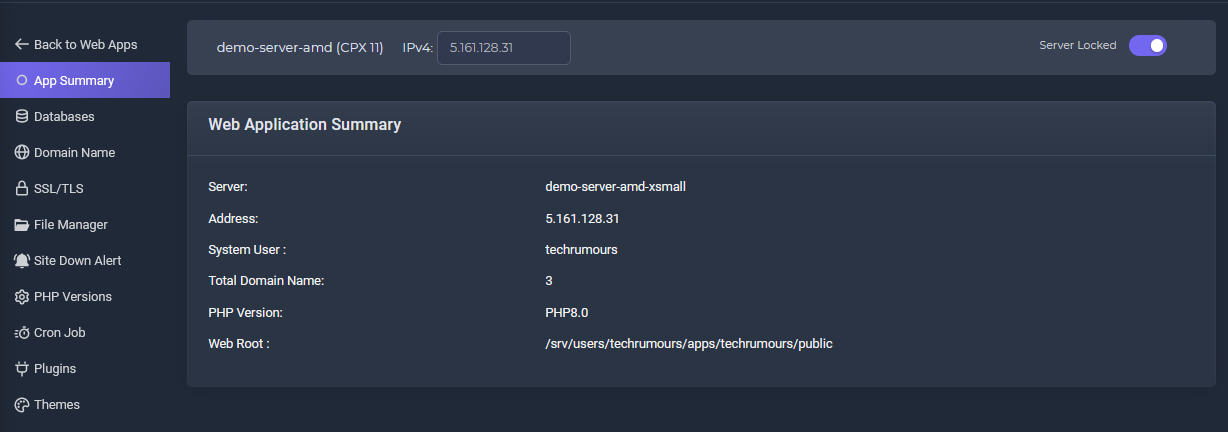
App's Summary Tab
Website application summary showing Server name, IP Address, System User for that app, PHP Version and web root location.
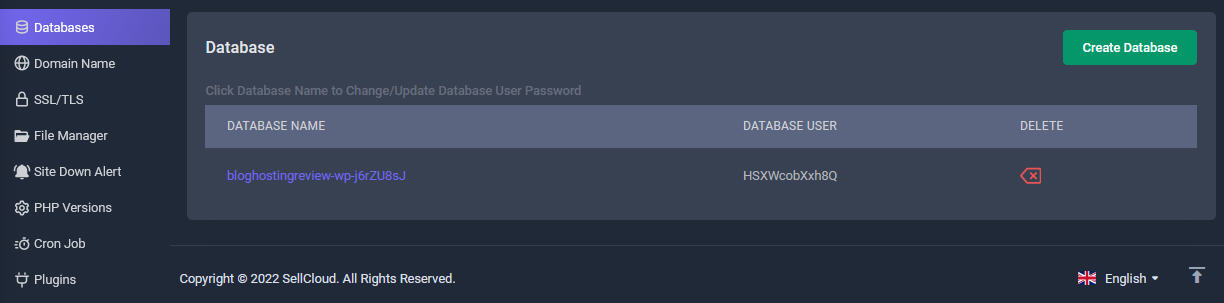
Database Tab
Once your Wordpress app is created, a database will be also created with database name, user and password.
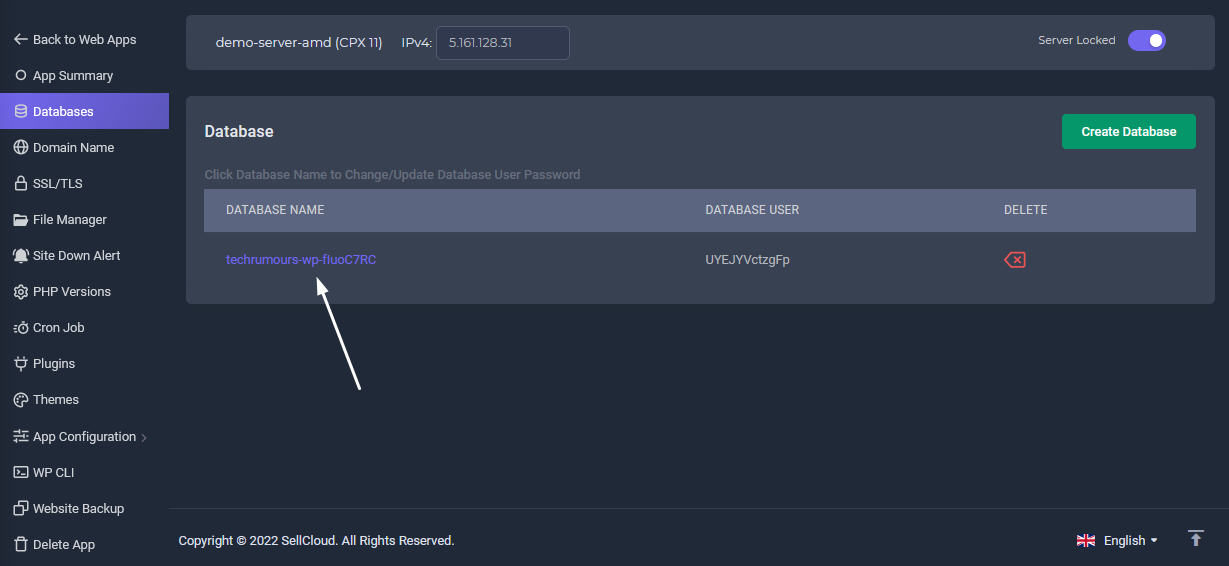
Change Database Password
Click the Database Name to Change/Update Database User Password. Your current database password can be found in the wp-config. php file from the root file directory of your app.
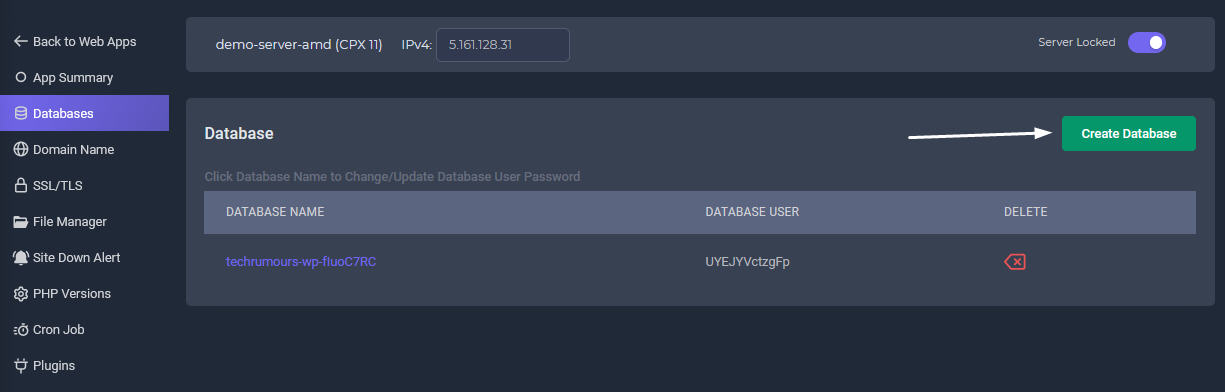
Create New Database
Many PHP apps require a MySQL database to function, and these databases can be created quickly from Sellcloud panel.
Click Create Database.
Then, choose a database name. Then choose a username and type in a password and click Add Database. Remember to write these down before creating database, so you can enter them when your PHP app asks.
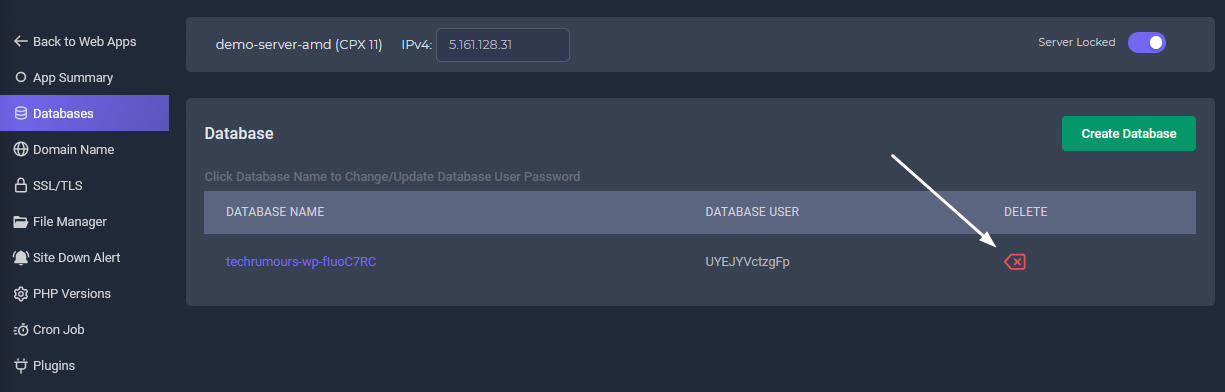
Delete A Database
You can delete a database using the Delete icon.
Warning : Do not delete any database unless you absolutely sure what you are doing! It may break your website!
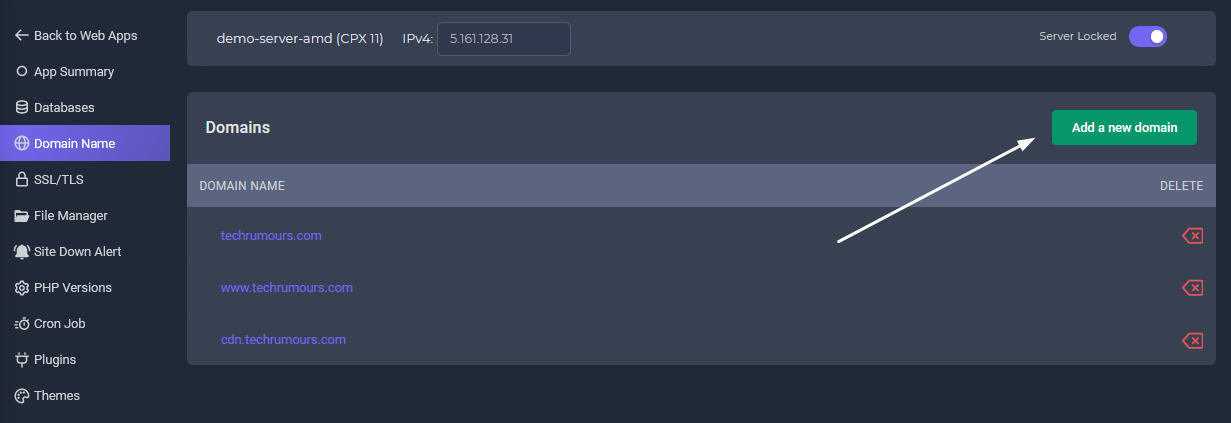
Domain Name Tab
If you didn't set your app's domain when you created it in SellCloud (or if you need to change it), don't fret. SellCloud makes it easy to add a domain to your app or to remove a domain you no longer use.
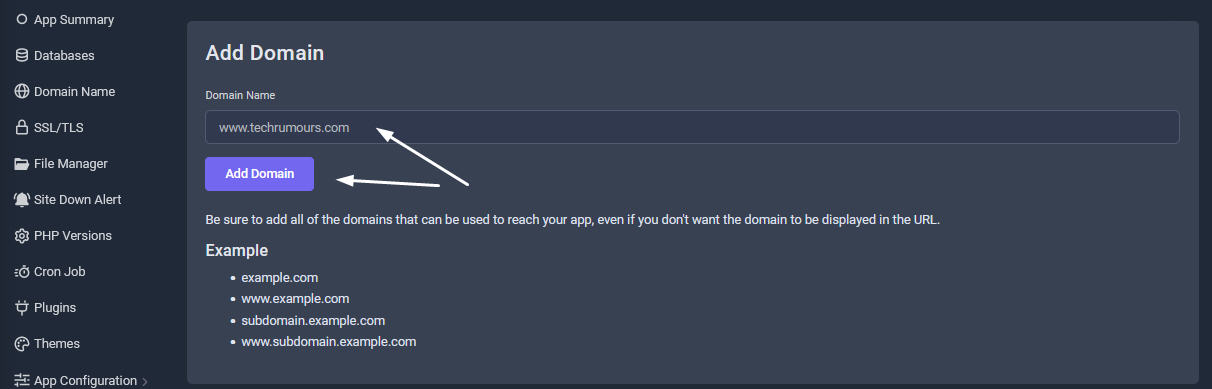
Add A Domain Name
First, open your app in SellCloud by selecting it from the list on the Apps screen. Under your app's Domains tab, enter any domains or subdomains for the app both with and without the www., clicking Add Domain after each one.
Be sure to add all of the domains that can be used to reach your app, even if you don't want the domain to be displayed in the URL. If you do not want one of your app's domains displayed, you can redirect it to the domain you do want shown; for example, redirecting www to non-www.
Example
- example.com
- www.example.com
- subdomain.example.com
- www.subdomain.example.com

Delete A Domain Name
If you need to remove a domain form your app, simply hover over the domain and click the red X icon to the right.

Deploy SSL On Your Site
Having an SSL certificate on your site is one of the best ways to build trust with your visitors, especially if your site is an ecommerce store. SSL creates a private, encrypted connection from your server to your visitors' browsers and allows personal information to be relayed without eavesdropping, tampering, or forgery.
SellCloud offers two ways to deploy SSL on your site: by using a free AutoSSL certificates issued by certificate authority, Let's Encrypt (CA) or by deploying a custom certificate you bought from a certificate authority (CA).It will automatically resolve your domain to the free AutoSSL and if your domain's A records is only pointing to your current DNS and Nameservers also pointing correctly to your current Domain registrar, AutoSSL will show as available for you to activate. Once you have deployed SSL, you can then enable redirection to HTTPS.
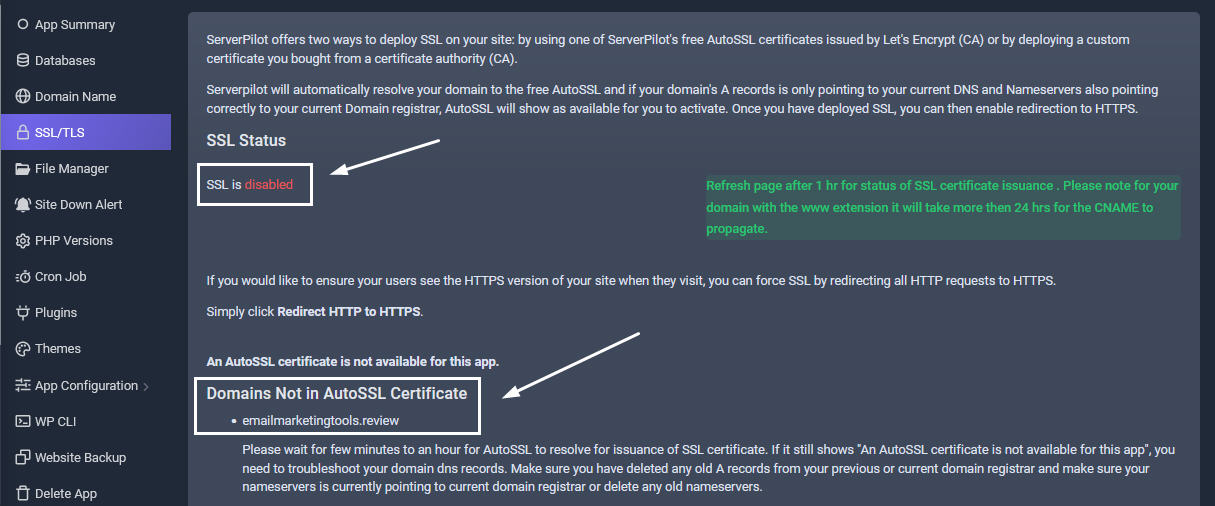
Waiting For SSL To Resolve
For Let's Encrypt certificates the issuance is generally between 30 minutes and 1 hour. If it still shows "An AutoSSL certificate is not available for this app", you need to troubleshoot your domain dns records. Make sure you have added an "A" record in the DNS tab in your control panel and also deleted any old A records from your previous or current domain registrar and also make sure your nameservers is currently pointing to current domain registrar or delete any old nameservers.
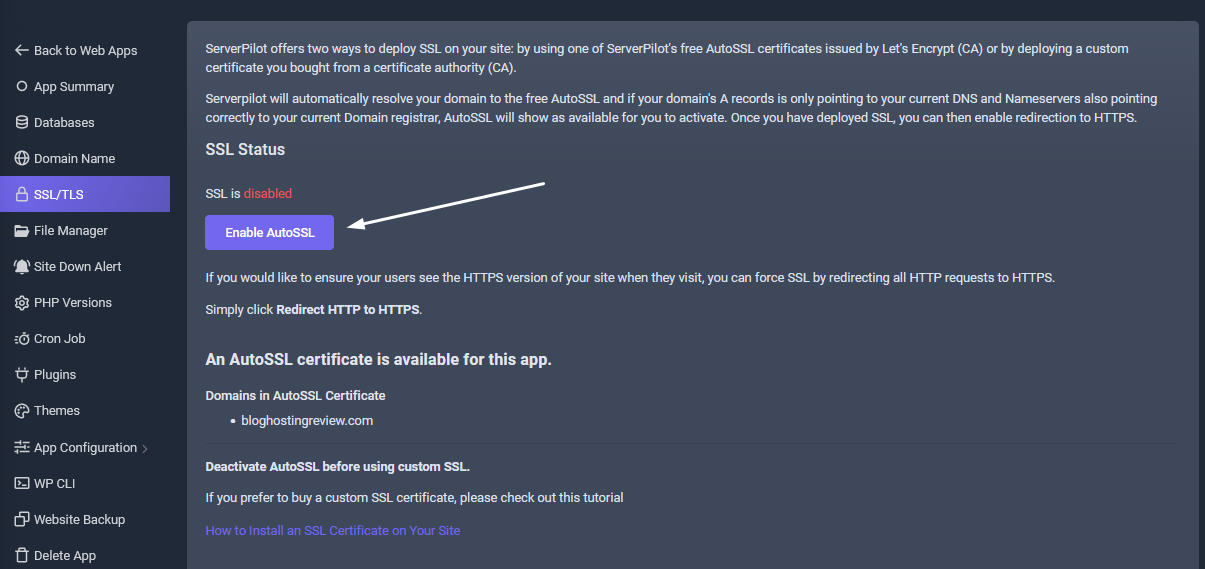
Enable SSL
Once you've added your app's domains, you'll have an AutoSSL option available in your app's SSL tab. After few minutes to an hour, If DNS resolves well, you will notice Enable AutoSSLbutton. Then Click Enable AutoSSL, and SellCloud will enable SSL for your app using an AutoSSL certificate. This certificate will be automatically renewed everytime before it expires.
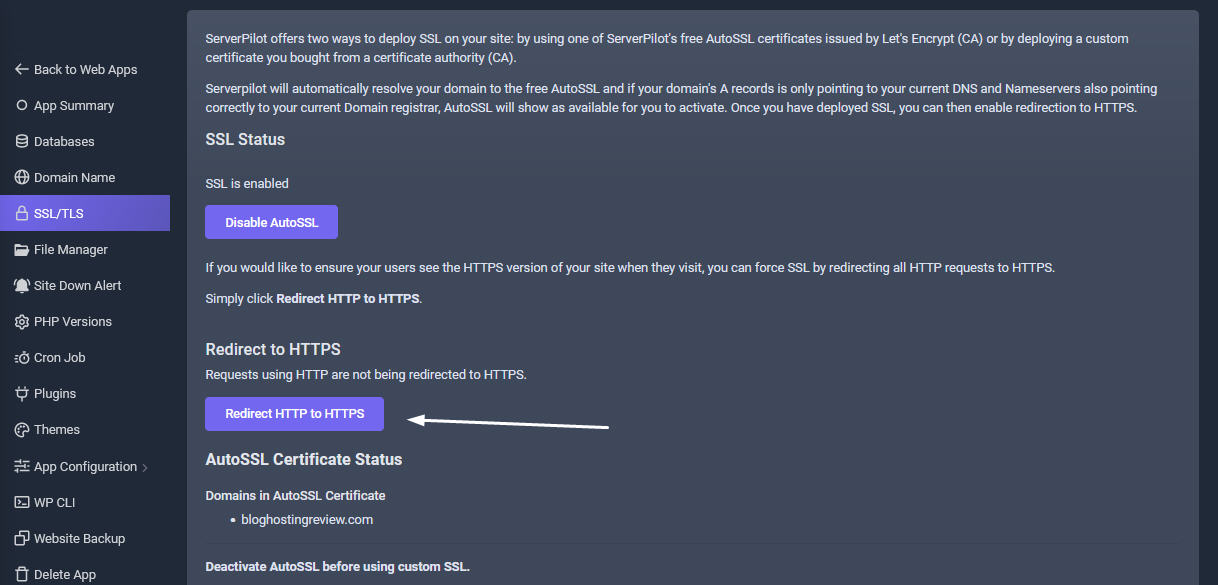
Redirect HTTP to HTTPS
If you would like to ensure your users see the HTTPS version of your site when they visit, you can force SSL by redirecting all HTTP requests to HTTPS. Simply click Redirect HTTP to HTTPS.
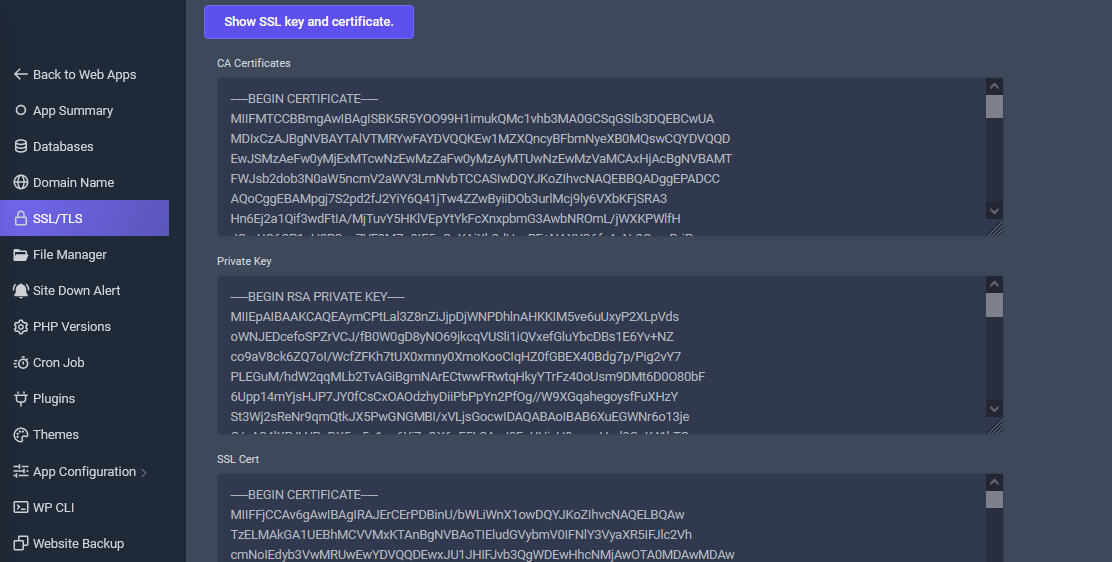
Show SSL Certificate.
You can view and copy your issued SSL certificates at any time here.
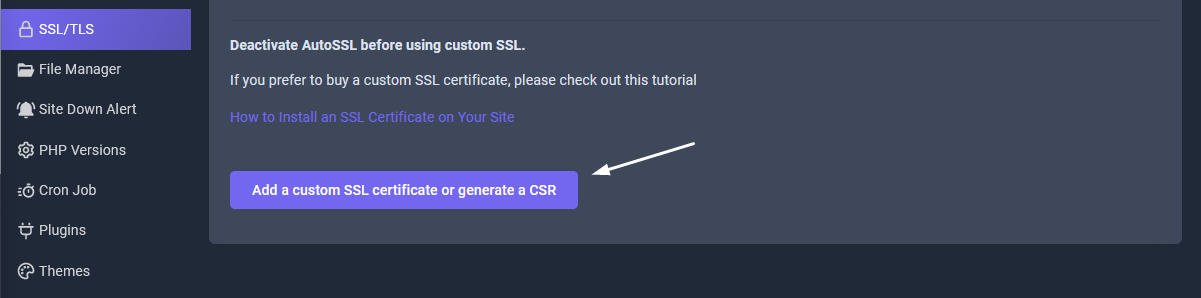
Custom SSL Certificate
If you prefer to buy a custom SSL certificate, please check out this tutorial
How to Install an SSL Certificate on Your Site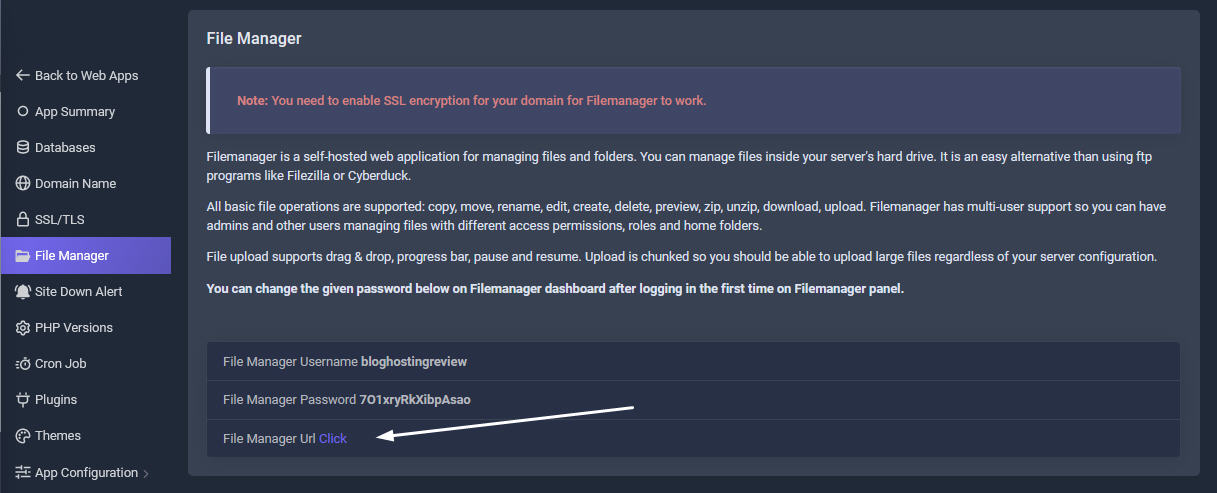
File Manager
Our built-in Filemanager is a browser based web application for managing files and folders on your server. You can manage files inside your server's hard drive. It is an easy alternative than using ftp programs like Filezilla or Cyberduck.
All basic file operations are supported: copy, move, rename, edit, create, delete, preview, zip, unzip, download, upload. Filemanager has multi-user support so you can have admins and other users managing files with different access permissions, roles and home folders.
File upload supports drag & drop, progress bar, pause and resume. Upload is chunked so you should be able to upload large files regardless of your server configuration.
You can change the given password below on Filemanager dashboard after logging in the first time on Filemanager panel.
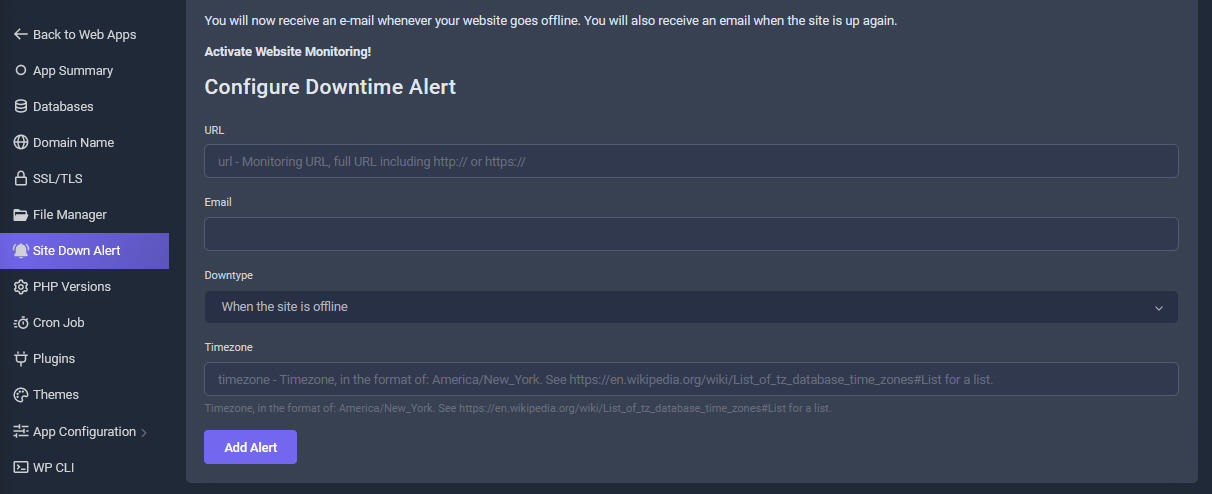
Website Monitoring
Website downtime is when a website is inaccessible or not functioning as it should for end-users. This could mean web pages failing to load or functions necessary for the website no longer working. If your site is down, it can be due to an error with your DNS settings, hosting provider, or web applications.
We have added a new feature using a third party website monitoring service. DownNotifier sends a free e-mail alert when your website is down.
Please register your domain with the form below. After registration, you will receive an activation email from DownNotifier. Please open the mail and click the link to confirm and activate monitoring. You will get your own monitoring panel from DownNotifier. You can add up to 5 sites per email account.
You will now receive an e-mail whenever your website goes offline. You will also receive an email when the site is up again.
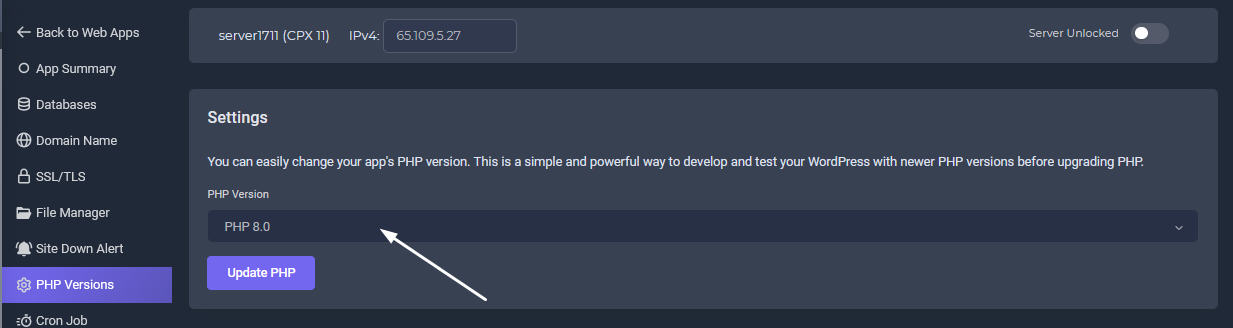
PHP Version
You can easily change your app's PHP version. This is a simple and powerful way to develop and test your WordPress with newer PHP versions before upgrading PHP. Click on the pull-down menu and select which version to use and then click Update PHP button.
All PHP versions prior to PHP 7.4 are end of life (EOL), meaning they no longer receive updates. Because of this, your site may be exposed to security vulnerabilities. Recommended version is PHP 8.0. If you choose PHP 8.1, please note that some scripts or plugin's authors may not have updated their products to work with PHP8.1. If you noticed any issues using PHP8.1, you can downgrade to PHP8.0 or 7.4.
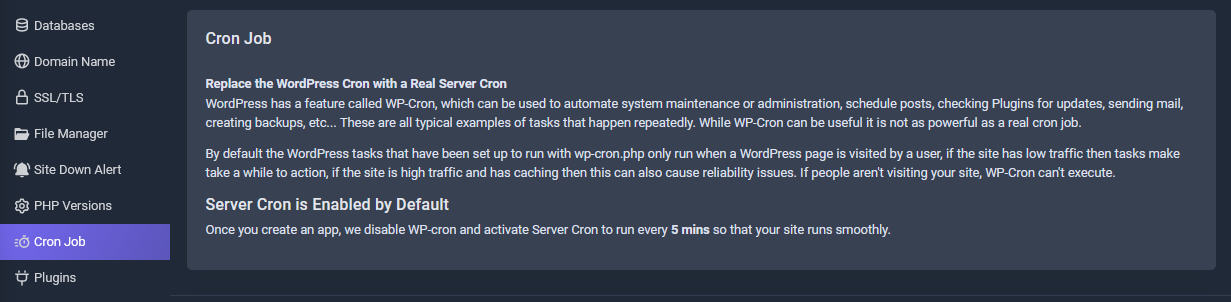
Cron Job
Replaces the WordPress Cron with a Real Server Cron
WordPress has a feature called WP-Cron, which can be used to automate system maintenance or administration, schedule posts, checking Plugins for updates, sending mail, creating backups, etc... These are all typical examples of tasks that happen repeatedly. While WP-Cron can be useful it is not as powerful as a real cron job.
By default the WordPress tasks that have been set up to run with wp-cron.php only run when a WordPress page is visited by a user, if the site has low traffic then tasks make take a while to action, if the site is high traffic and has caching then this can also cause reliability issues. If people aren't visiting your site, WP-Cron can't execute.
Server Cron is Enabled by Default.
Once you create an app, we disable WP-cron and activate Server Cron to run every 5 mins so that your site runs smoothly.
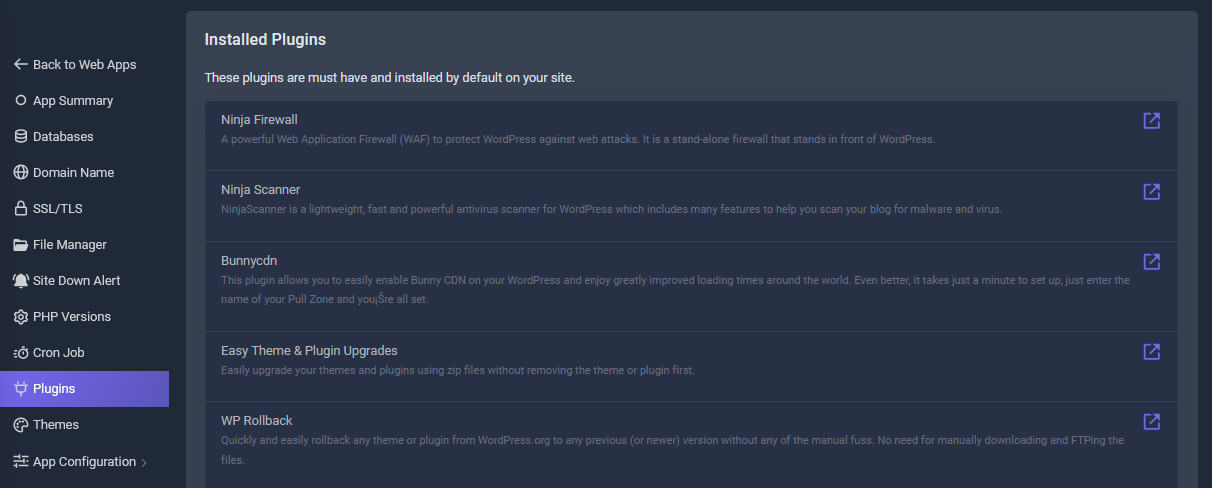
Installed Plugins
We have put together our top picks for the best WordPress plugins. These plugins are must have and installed by default on your site. Quality, active plugins are frequently updated by their developers so you get the best ones listed in our panel to be activated of your choice. Once any plugins activated, you can login to your WordPress control Panel and deactivate and delete any plugins you don't need.
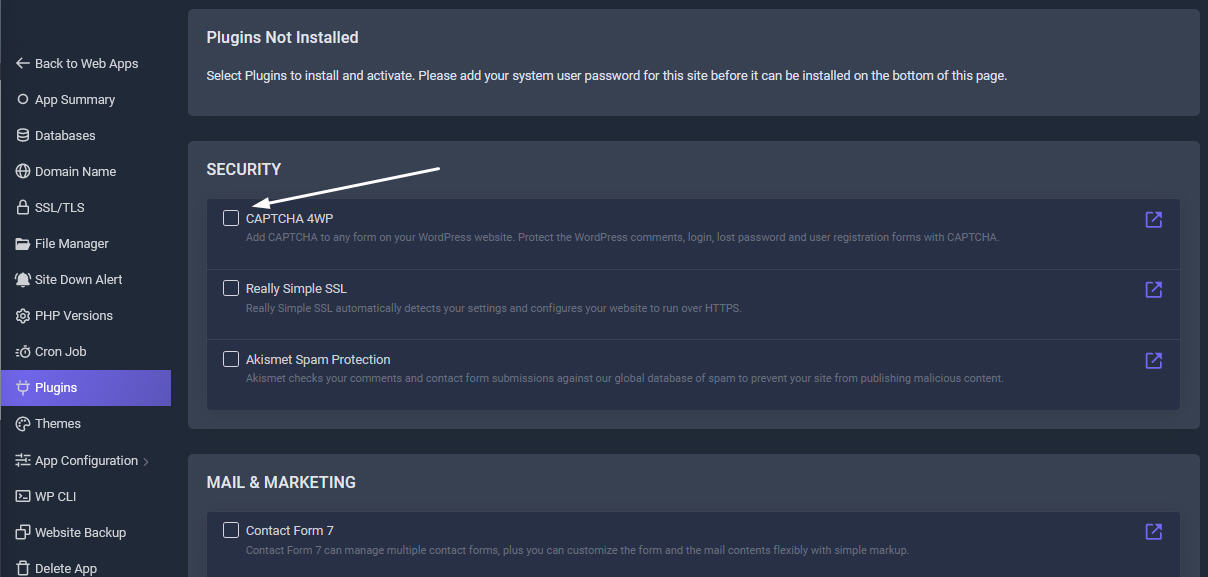
Plugins Not Installed
Select Plugins to install and activate. We have put together our top picks for the best WordPress plugins. Quality, active plugins are frequently updated by their developers so you get the best ones listed in our panel to be activated of your choice.
Please add your system user password for this site before it can be installed on the bottom of this page.
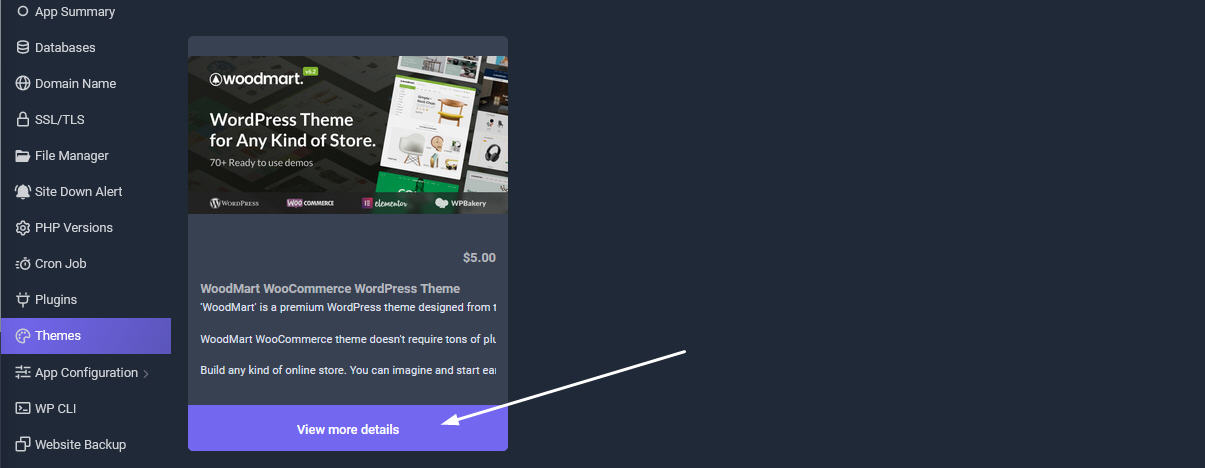
75 Premium Woodmart Wordpress Theme
We have built-in site builder right in your panel. You can install 74+ demo themes with one click without hiring a web designer. This is an optional paid feature strongly recommended to our clients. WoodMart WooCommerce theme doesn't require tons of plugins to run your online store. The most important features come out of the box and you don't need to purchase anything extra. Wishlist, compare, product swatches, AJAX filters, built-in slider and other features will save you from installing at least 10-20 unnecessary plugins. Use our quick setup wizard and run your online store in a few clicks.
Build any kind of online store. You can imagine and start earning that passive revenue stream you have been thinking about with 'WoodMart' for WordPress? and never look back.
Check out 74+ Demo Themes & All Features Here
Installation Service + Envato License + Theme Files + Lifetime Updates + 6 Months Support + All necessary Plugins = $99
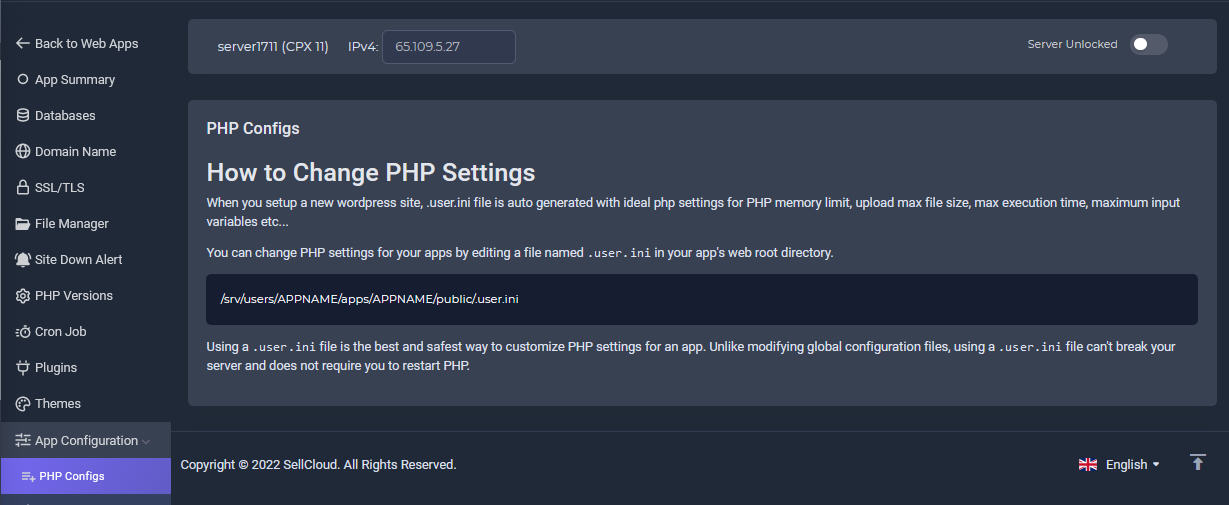
Change PHP Settings
When you setup a new wordpress site, .user.ini file is auto generated with ideal php settings for PHP memory limit, upload max file size, max execution time, maximum input variables etc...
You can change PHP settings for your apps by editing a file named .user.ini in your app's web root directory. You can download or edit it right inside your panel using from the FileManager tab.
/srv/users/APPNAME/apps/APPNAME/public/.user.ini
Using a .user.ini file is the best and safest way to customize PHP settings for an app. Unlike modifying global configuration files, using a .user.ini file can't break your server and does not require you to restart PHP.
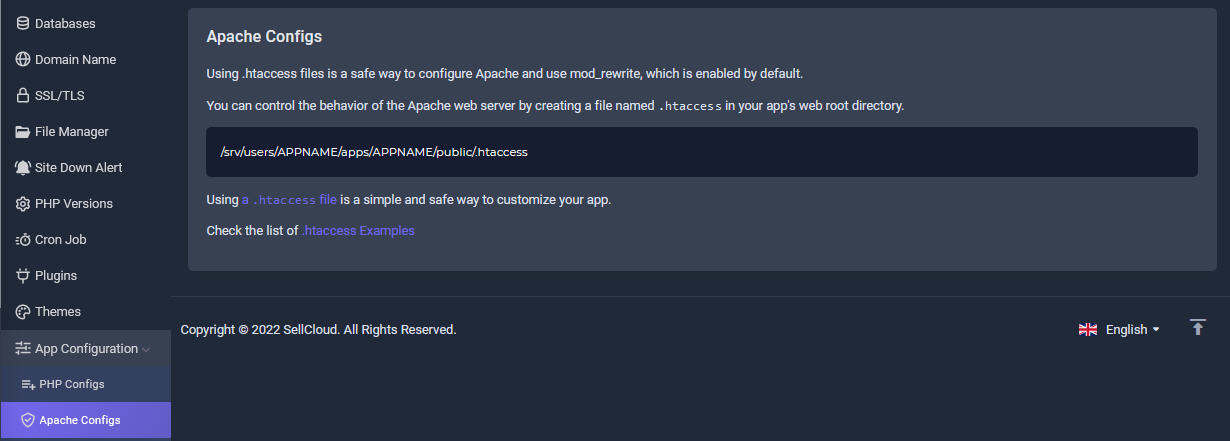
Apache Configs
Using .htaccess files is a safe way to configure Apache and use mod_rewrite, which is enabled by default.
You can control the behavior of the Apache web server by creating a file named .htaccess in your app's web root directory.
/srv/users/APPNAME/apps/APPNAME/public/.htaccess
Using a .htaccess file is a simple and safe way to customize your app.
Check the list of .htaccess Examples
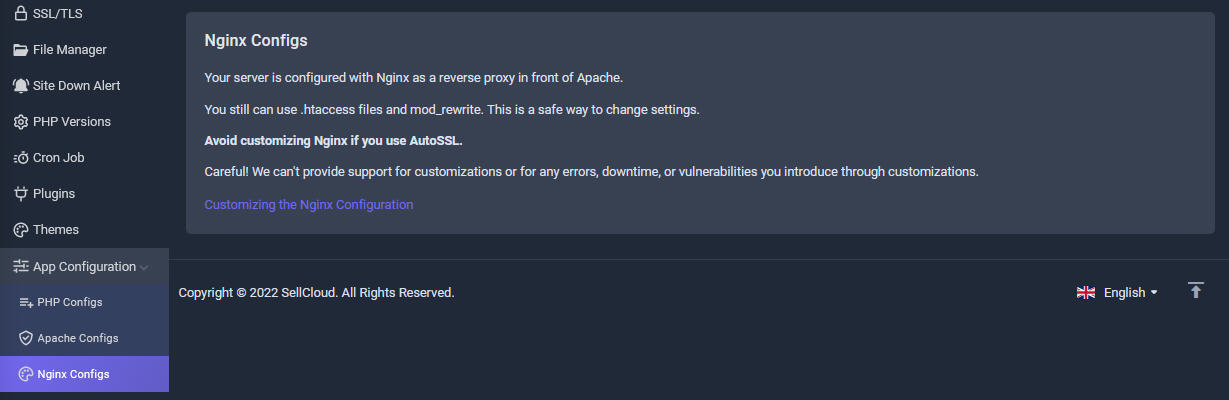
Nginx Configs
Your server is configured with Nginx as a reverse proxy in front of Apache.
You still can use .htaccess files and mod_rewrite. This is a safe way to change settings.
Avoid customizing Nginx if you use AutoSSL.
Careful! We can't provide support for customizations or for any errors, downtime, or vulnerabilities you introduce through customizations.
Customizing the Nginx Configuration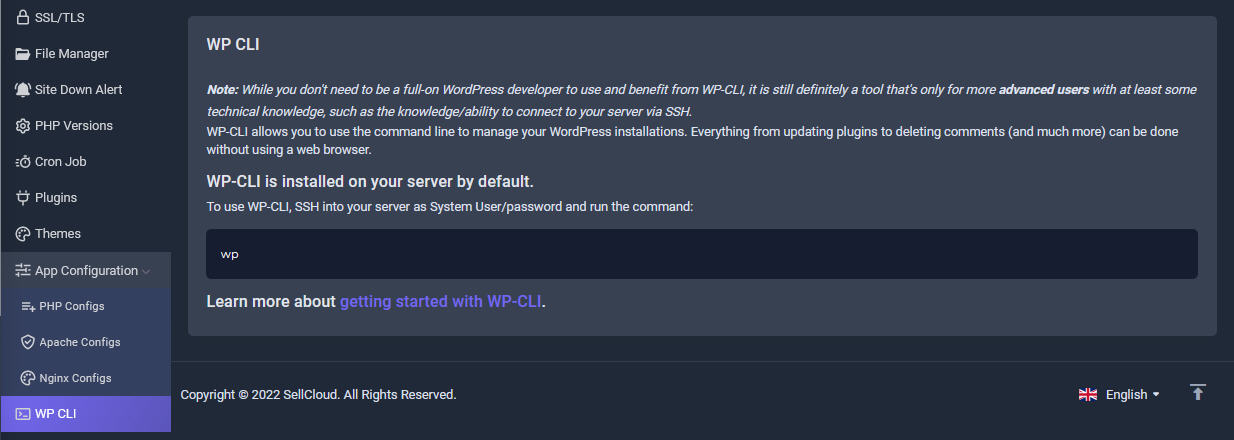
WP CLI
WP-CLI allows you to use the command line to manage your WordPress installations. Everything from updating plugins to deleting comments (and much more) can be done without using a web browser.
WP-CLI is installed on your server by default.
To use WP-CLI, SSH into your server as System User/password and run the command:
wp
Learn more about getting started with WP-CLI.
Website Cloud Backup
We only backup your server daily for free. It is also best to backup your Website files & Databases separately. We offer paid optional 3rd party Website Cloud Backup services for our clients. We have shown 4 ways to backup your website in your panel for your attention.
They are:
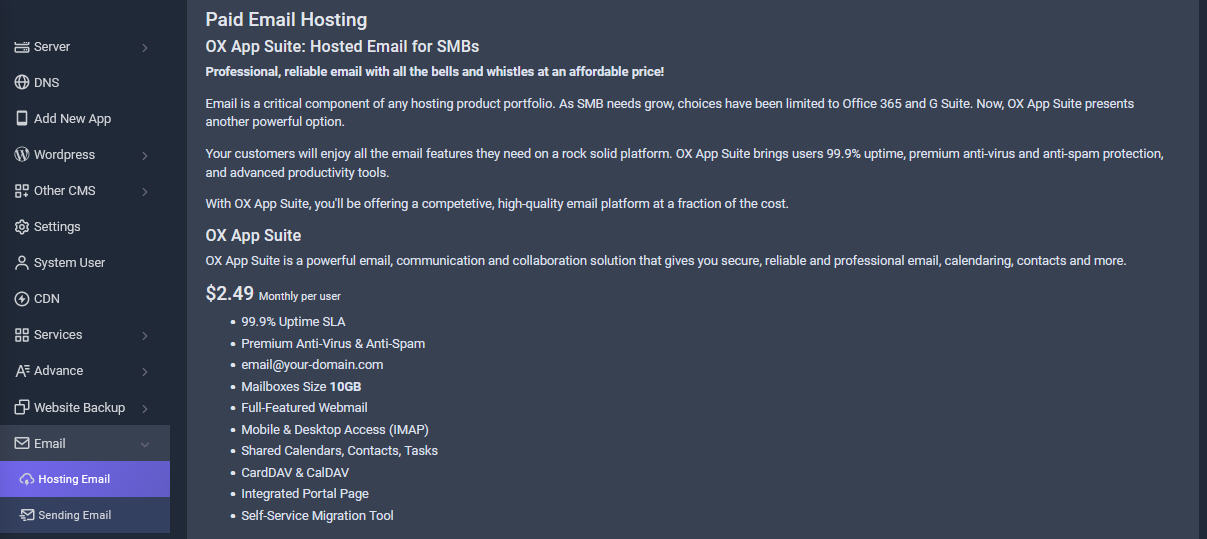
Paid Email Hosting
OX App Suite: Hosted Email for SMBs. Professional, reliable email with all the bells and whistles at an affordable price!
Email is a critical component of any hosting product portfolio. As SMB needs grow, choices have been limited to Office 365 and G Suite. Now, OX App Suite presents another powerful option.
Your customers will enjoy all the email features they need on a rock solid platform. OX App Suite brings users 99.9% uptime, premium anti-virus and anti-spam protection, and advanced productivity tools.
With OX App Suite, you'll be offering a competetive, high-quality email platform at a fraction of the cost.
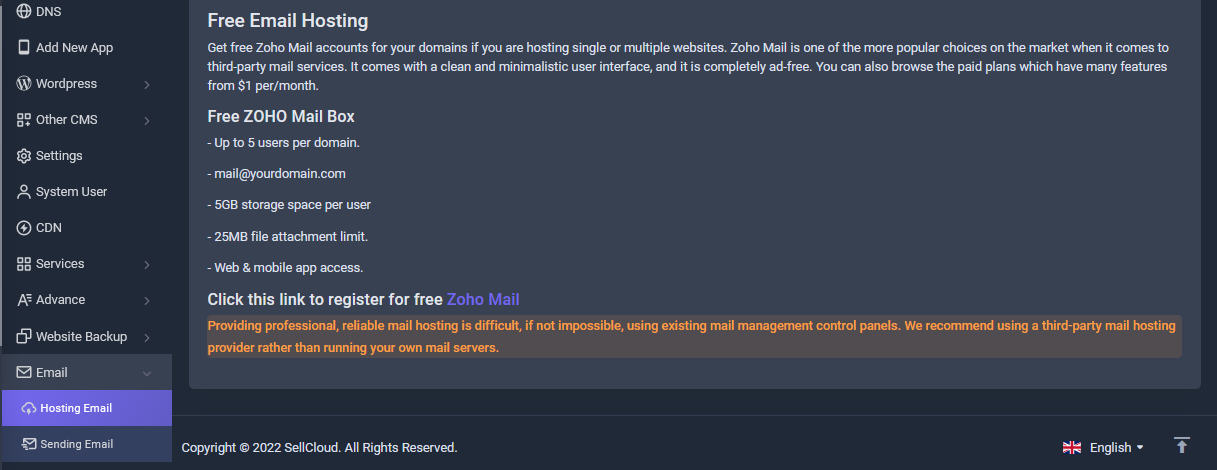
Free Email Hosting
Get free Zoho Mail accounts for your domains if you are hosting single or multiple websites. Zoho Mail is one of the more popular choices on the market when it comes to third-party mail services. It comes with a clean and minimalistic user interface, and it is completely ad-free.
Free ZOHO Mail Box
- Up to 5 users per domain.
- mail@yourdomain.com
- 5GB storage space per user
- 25MB file attachment limit.
- Web & mobile app access.
Click this link to register for free Zoho Mail
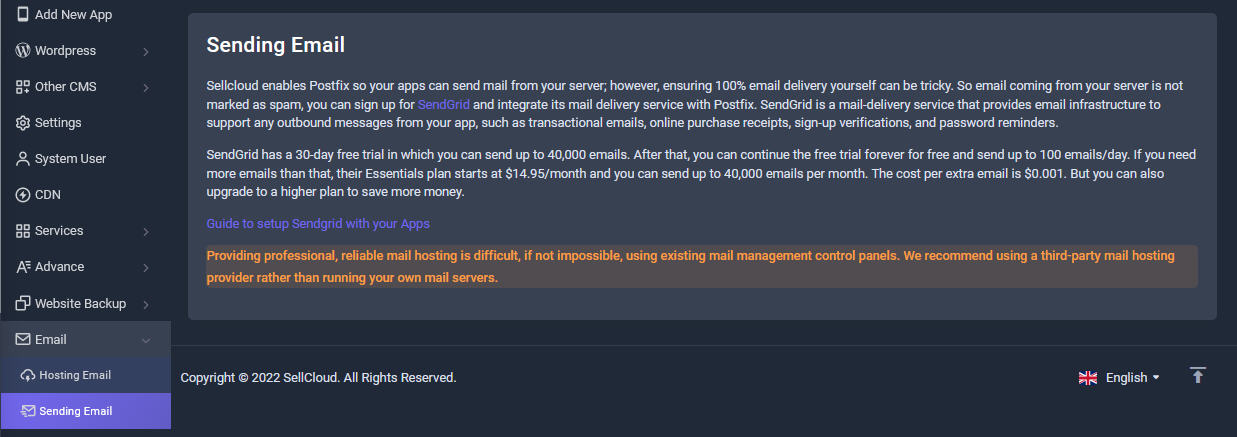
Sending Email
Sellcloud enables Postfix so your apps can send mail from your server; however, ensuring 100% email delivery yourself can be tricky. So email coming from your server is not marked as spam, you can sign up for SendGrid and integrate its mail delivery service with Postfix. SendGrid is a mail-delivery service that provides email infrastructure to support any outbound messages from your app, such as transactional emails, online purchase receipts, sign-up verifications, and password reminders.
SendGrid has a 30-day free trial in which you can send up to 40,000 emails. After that, you can continue the free trial forever for free and send up to 100 emails/day. If you need more emails than that, their Essentials plan starts at $14.95/month and you can send up to 40,000 emails per month. The cost per extra email is $0.001. But you can also upgrade to a higher plan to save more money.
Guide to setup Sendgrid with your Apps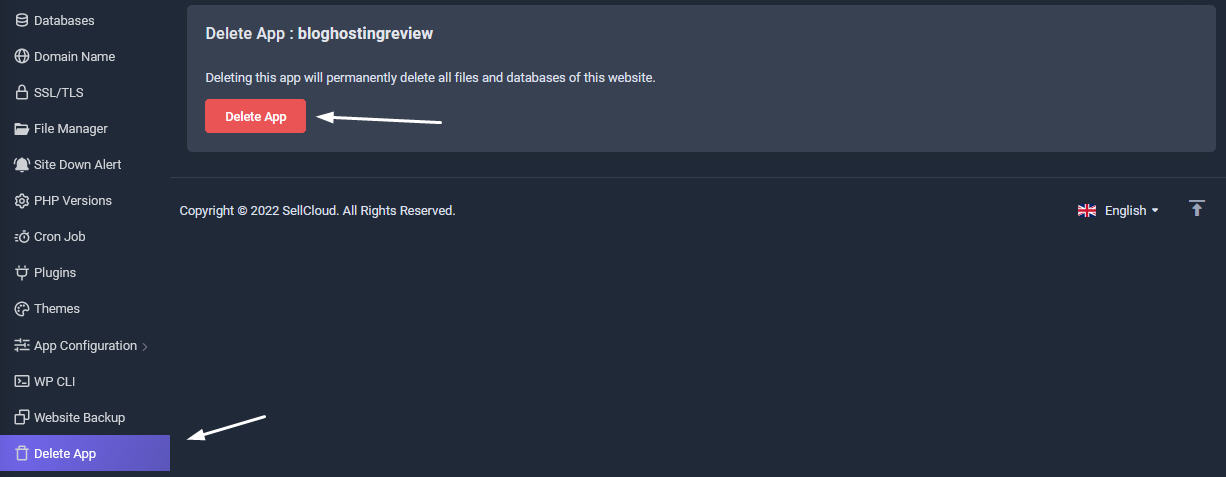
Delete App
Warning: Deleting this app will permanently delete all files and databases of this website. The data won't be retrievable.